A Brief Guide to Canvas-Covered Old Town Canoes
December 6, 2019
by Mike Elliott, Kettle River Canoes
email: artisan@canoeshop.ca
In America, the Old Town Canoe Company set the standard by which all other canvas-covered canoes are measured. With more than 170,000 produced over the course of seven decades or more, Old Town canoes are ubiquitous. So let’s look at a few of their classic models and compare them. From this, you ought to be able to identify your Old Town. However, be prepared for any American canoe to be called an Old Town.

The Old Town Canoe Company
The brand-name Old Town is synonymous with canvas-covered canoes in the United States. They are one of the only canoe companies to survive into the present day from their humble beginnings behind the Gray hardware store in Old Town, Maine in 1898. George and Samuel Gray incorporated the Old Town Canoe Company in 1901. They were entrepreneurs who hired others to design and build their canoes. The company kept meticulous build records which are still available through the WCHA. Their designs appealed to customers across the full range of styles from work-a-day canoes to elegant showpieces. So, let’s look at some of these quintessential canoes.

The Otca Model
Probably the best selling of all the Old Town models, the Otca was introduced in 1908 and began with a narrow hull (34.5” beam in the 16’ length) and later adopted the wide, flat-bottom of the Yankee model (36” beam in the 16’ length). According to their 1938 catalog, “The ‘Otca’ model is the widest, deepest and roomiest. These features make it the steadiest, safest and most capacious canoe we build. The floor is flat and wide, and carries far into the ends. The sides are convex, thus producing a handsome tumblehome. This model is not designed for speed but comfort, safety and fine appearance.”

The Otca caters to novice canoeists as well as those looking for a leisurely day on the water. There is little to no rocker at the ends, so it tracks very well. As a friend of mine explained, “It goes in a straight line. If you want to turn, just paddle until you reach the opposite side of the lake, get out, turn the canoe around and head back.”
It comes in 16’, 17’ and 18’ lengths and usually has a floor rack installed. It sports elegant, up-swept ends with a variety of deck styles over the years including a 16” solid-wood, pre-bent deck, a 20” one-piece deck with a low coaming and a 30” framed-veneer deck with a king-plank and coaming. The ribs in the Otca are standard-issue (5/16” thick, 2” wide spaced 1.5” apart and tapered on both sides to be approximately 1.5” wide at the sheer-line). The 16’ model weighs approximately 75 pounds.

The Yankee Model
This canoe (known as the Livery Model prior to 1920) was phased out in favour of the Otca in the 1940’s. It is a very easy paddling canoe. The flat bottom and soft chine makes it both steady and quick. It is 16’ long, 36” beam, 12” deep and weighs approximately 73 pounds. With fine entry lines and moderate rocker at the ends, it is a delight to paddle.


The Ideal Model
The Ideal comes in 16’ and 17’ lengths. It has a flat bottom, soft chine, straight sides, moderate rocker and fine entry lines making for a quick, responsive canoe. The floor is furnished with half-ribs to make it strong and comfortable. The ends sweep up with an elegant rise in the sheer-line. It is a quick, easy paddler and becomes more stable as it is loaded.


The Charles River Model
This canoe (introduced in 1903) is the same as the Ideal without the half-ribs. It was often furnished with a floor rack and was built with elegance and showy good looks in mind. That said, its flat-bottom, soft chine and fine entry lines produce in a canoe that was just as much fun to paddle as it was a delight to look at. Both the Ideal and Charles River were phased out in 1929.


The Guides Special Model
This is a slow, steady work-a-day canoe that comes in 18’ and 20’ lengths. The 18’ model has a 36” beam and is 13” deep. It has a flat-bottom, slight tumblehome, very little rocker and full ends. This workhorse is meant to be loaded and will get you where you want to go. Just don’t expect to get there quickly.

The H W Model
The Heavy Water Model is the consummate back-country traveler. It has moderate rocker, a semi-arch “yawl” hull, mild tumblehome through the entire length and full ends. With a narrow beam, this canoe is very quick on the water. Stability is traded for a canoe which is agile and responsive. It takes a little getting used to and once you do, it dances through river rapids. In my books, it is a delightful recreational canoe. The 16’ model has a 33” beam, is 12” deep at the centre and weighs about 70 pounds.


The 50-LB. Model
The “50-Pounder” is a series of light-weight versions of the HW model. They come in 11’, 13’ and 15’ lengths and weigh 50, 53 and 58 pounds respectively. They are constructed with ribs ¼” thick to produce canoes which are easy to portage. Modest tumblehome extends the entire length of the canoe and the bottom has a semi-arch and fine entry lines. The result is a versatile all-purpose canoe. Personally, I enjoy the 15’ model. It is light, quick and both steady and agile to handle rivers and lakes with ease.
by Mike Elliott, Kettle River Canoes
email: artisan@canoeshop.ca
The blogs I do on the specifications of canoe components for various types of canvas-covered canoes seem to be quite popular. Apparently, I am the only one out there taking the time to write about this stuff and share it with others on-line. This time around, I am presenting a restorer’s guide to the Bobs Special from the Chestnut Canoe Company.
This canoe was one of two lightweight pleasure canoes built by Chestnut (the other was an 11’ solo canoe called the Featherweight that weighed about 38 pounds). Before I talk about the canoe, I’d like to clarify the name. According to Roger MacGregor in his book When the Chestnut was in Flower, Henry and William Chestnut were real history buffs. The telegraph code for the 15’ 50-Lb. Special was BOBS and made reference to Lord Roberts, a major figure during the Second Boer War in South Africa. Over the years, as this wide, light-weight canoe became more difficult to keep under the weight limit of 50 lbs. (the average weight was 58 pounds while the carrying capacity was 700 pounds), they changed the name. I have seen a variety of Chestnut catalogues call it Bob’s Special, Bob Special and Bobs Special. So, feel free to take your pick.

If you happen to have a Bobs or have been lucky enough to come across one in need of some TLC, you will notice what a sweet little canoe this is. It paddles like a dream which is surprising for a canoe that is 37” (94 cm) wide. Its bottom has a shallow-arch that reduces the waterline width when paddled with a light load. There is a fair amount of rocker in the ends which adds to its maneuverability. At the same time, it is not difficult to stand up in a Bobs – making it ideal for fly-fishing or general recreational paddling for a less experienced paddler.

One little note here: I am listing all of the dimensions in inches. I apologize to all of you who are working in metric. The canoes were built with imperial measurements originally, so I find it easier and more accurate to stick with this measurement scale.

Inwales –The inwale is a length of White Ash or Douglas Fir 15/16” high with the edge grain visible on the top surface. It is fashioned to fit the tumblehome present on most Chestnut canoes. Therefore, the top surface is 9/16” wide while the bottom width is 11/16”. The last 18” or so at each end is tapered down to about ½” wide (top and bottom) along the sides of the decks. All of the transverse components (centre thwart and seats) are attached to the inwales with 10-24 (3/16”) galvanized steel carriage bolts. I replace these with 10-24 silicon-bronze carriage bolts.

The gunwales (both inwales and outwales) are pre-bent about 18” from the ends. If you are replacing these components, the wood will have to be soaked for 3 days, heated by pouring boiling water over them and bent onto custom-built forms in order to get a proper fit.

Outwales – The outwales are also made of White Ash or Douglas Fir. Depending on when the canoe was built, the outwales may have a chamfered edge on the bottom of the outside surface. Water often gets trapped under the outwales and results in rot on the inside surface of the originals because they assembled the canoe first and then applied paint and varnish. Consequently, the inside surfaces of the outwales are bare wood. Therefore, I usually end up replacing this component. Prior to installation, I seal the wood on all surfaces with a couple of coats of spar varnish. Unlike the original builders, I do all of the painting and varnishing first and then assemble the canoe.

Decks – The decks the Bobs Special were made of hardwood – usually maple, white ash or white oak. Sometimes, they used mahogany to help reduce the overall weight. By the time you start restoring your canoe, the decks are often rotted along with the stem-tops and inwale-ends. They are attached to the inwales with six 1¾” #8 bronze wood screws. As with the outwales, I help prevent future rot by sealing the decks on all surfaces with a couple of coats of spar varnish. The deck extends about 18” into the canoe from the end.

Stem-Top – You will rarely if ever have to replace the entire stem. However, I rarely see an original stem-top that is not partially or completely rotted away. Because the top 6” or so of the stem is straight, you can usually make the repair without having to pre-bend the wood to fit the original stem-profile.

Keel – The Bob Special had a regular (tapered) keel installed. Use a piece of hardwood (the original was ash) and taper each end to 3/8” wide. The overall length is about 13’. It will accept the brass stem-band which is 3/8” wide.

Ribs – The Bobs Special was constructed with so-called “regular” ribs (2-3/8” wide) that were ¼” thick instead of the normal 3/8”. They create a light-weight canoe but are not as robust as the regular ribs. You will probably encounter several broken ribs in your canoe restoration.
The edges of the ribs are chamfered in most Bobs Specials. Replicate the angles found in your canoe. Often, the edge closest to the centre of the canoe has tapered ends (11° chamfer) while the edge closest to one end of the canoe is chamfered about 25°.

Planking – The planking in Chestnut Canoes was made of either Eastern White Cedar or Western Red Cedar. Although the planks started out at 5/32” thick, you will probably be shaving replacement planks down to match the original planks. Again, this results in a lighter, less robust canoe. You will probably encounter many broken planks in your canoe.
Seats – The seat frames are made of ¾” ash, oak or maple that is 1½” wide. Both seats are suspended under the inwales with 10-24 carriage bolts and held in position with 5/8” hardwood dowel. The rear stern seat dowels are 1¾” long while the front dowels are ¾” long. All of the bow seat dowels are ¾” long. The forward edge of the bow seat is about 51½” from the bow-end of the canoe while the forward edge of the stern seat is about 39½” from the stern-end of the canoe.

Centre Thwart – The thwart is made of ¾” ash that is 2½” wide. It tapers from the centre to create handle grips on either side that are 2” wide. They were attached directly under the inwales with galvanized steel 10-24 carriage bolts. As with every component in the canoe, I seal the entire thwart with a couple of coats of spar varnish prior to installation and replace the original galvanized steel bolts with silicon bronze bolts.

All of this (and much more) is described in my book – This Old Canoe: How To Restore Your Wood Canvas Canoe.
If you live in Canada, CLICK HERE to buy the book.
If you live in the USA, CLICK HERE to buy the book.
If you live in the UK, CLICK HERE to buy the book.
Si vous habitez en France, CLIQUEZ ICI acheter le livre.
Weaving the Peterborough Pattern in Wood-Canvas Canoe Seats
August 5, 2018
by Mike Elliott, Kettle River Canoes
email: artisan@canoeshop.ca

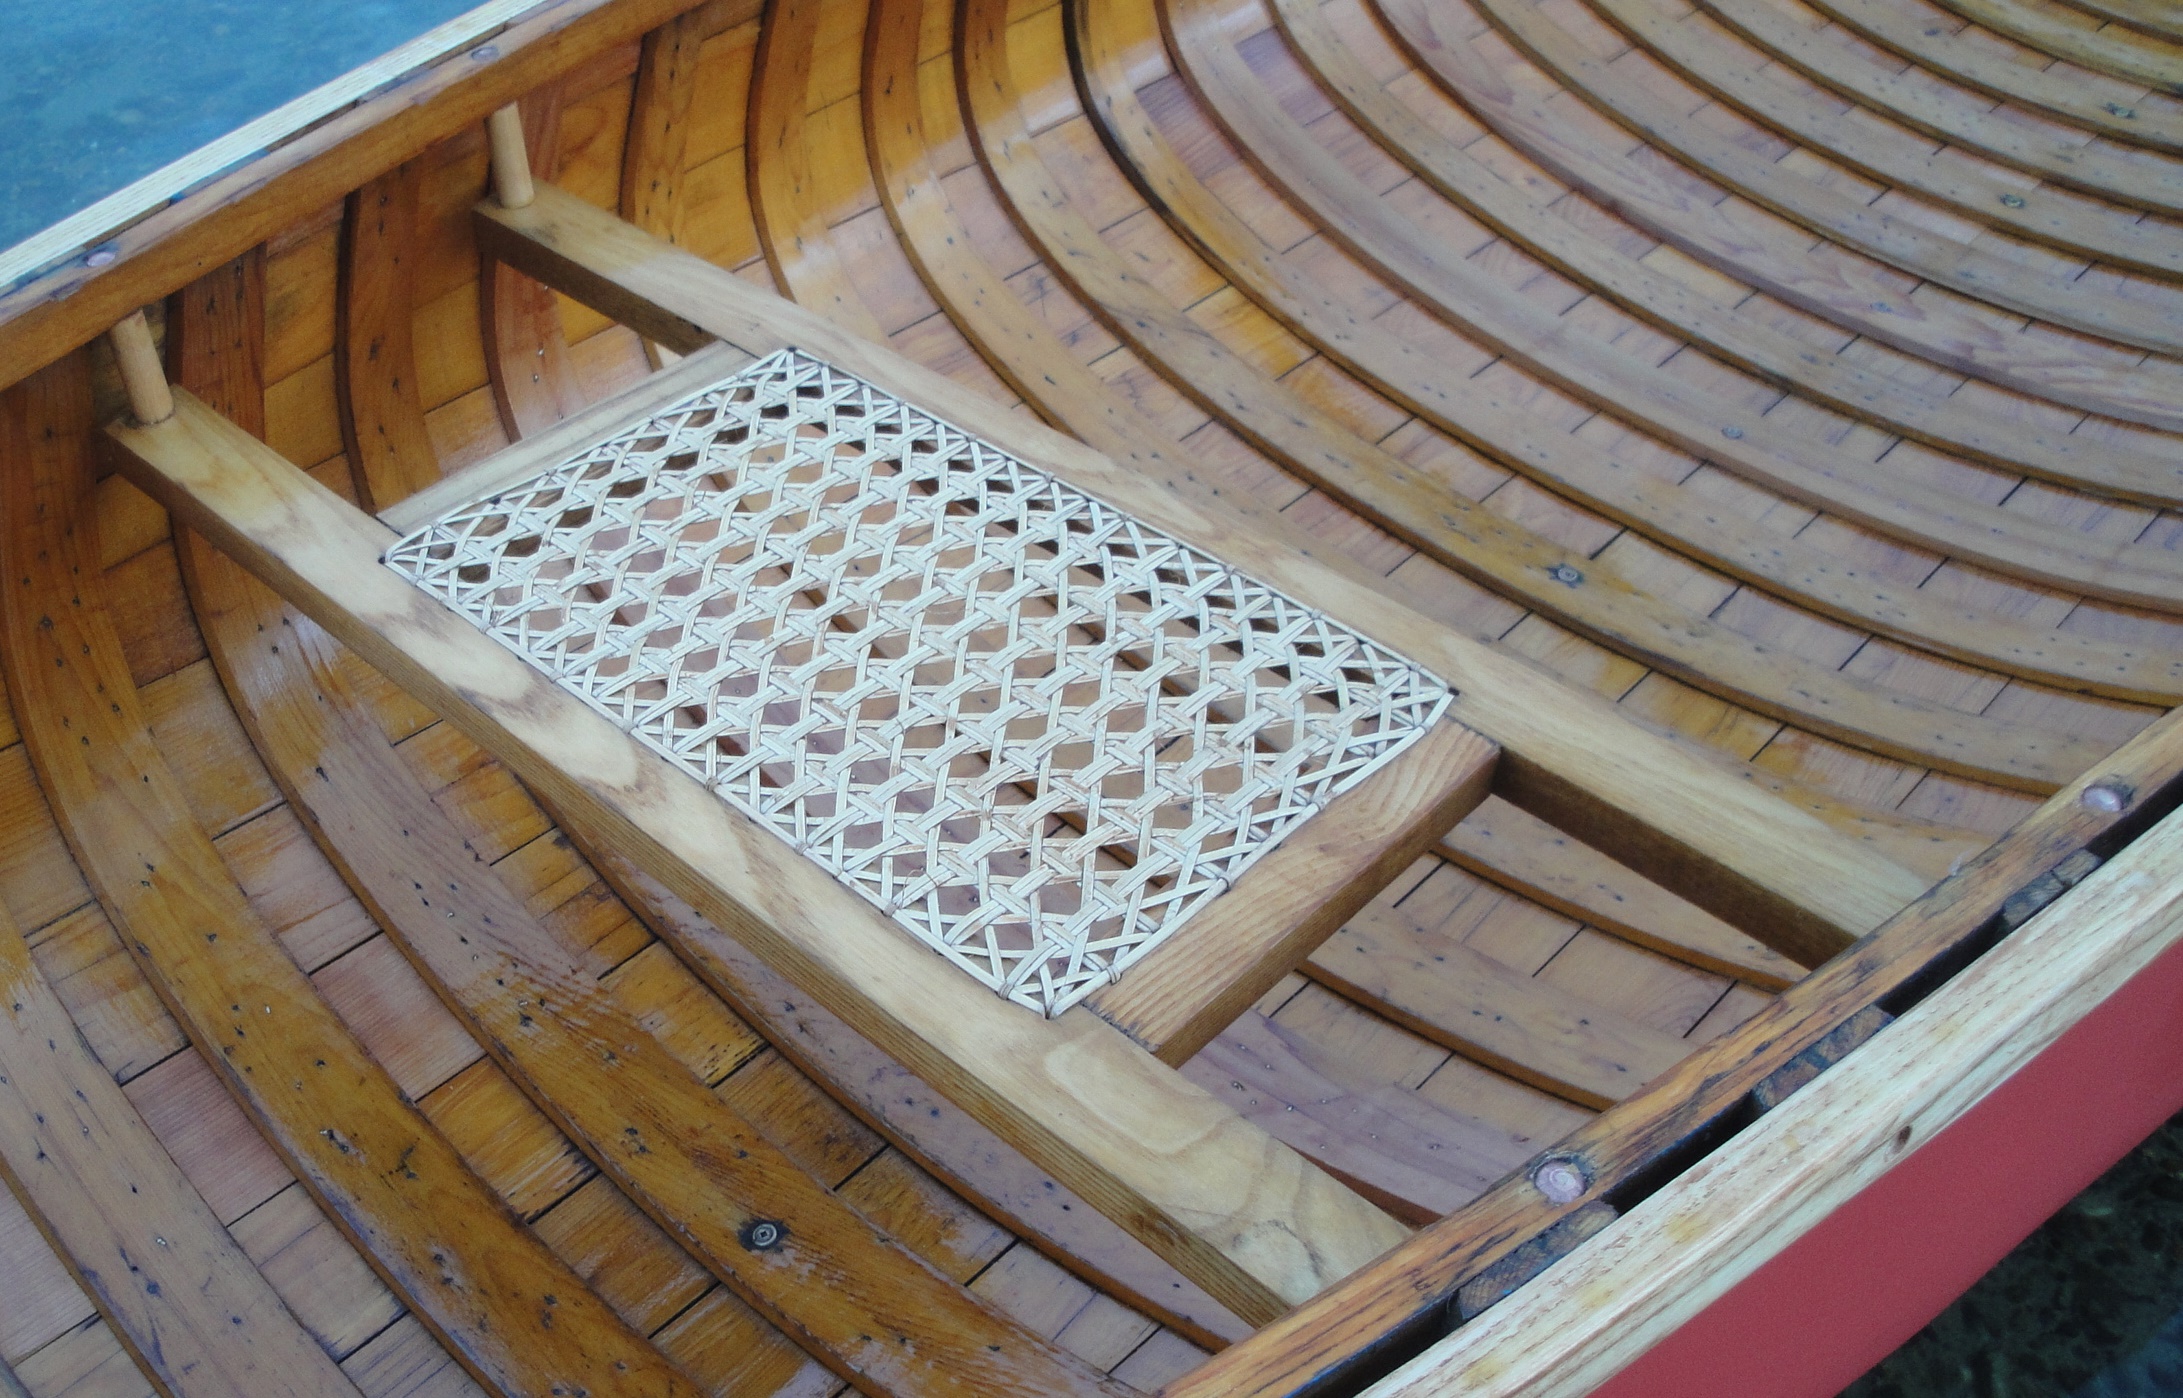
In my book, This Old Canoe: How To Restore Your Wood-Canvas Canoe, I describe how to weave natural cane (rattan) in Chestnut canoe seats. However, most canoe builders used their own weaving pattern for their canoe seats.

The Peterborough Canoe Company (1879 – 1961) installed hand-woven cane seats in many of their wood-canvas canoes as well as many of their all-wood canoes. Their pattern is similar to the six-stage “quick” pattern used by the Chestnut Canoe Company (1897 – 1978). Only the sixth stage in the pattern is different. In the Chestnut pattern, both diagonal weaving stages (fifth and sixth stages) weave under the vertical strands and over the horizontal strands. In the Peterborough pattern, the sixth stage weaves over the vertical strands and under the horizontal strands.
In my book, I describe the full process of preparing the seat frames, preparing the cane and handling the cane during the weaving process. Here I will present the basic look of each stage and give details for the sixth stage only for the Peterborough pattern.

First Stage ̶ Vertical strands

Second Stage ̶ Vertical strands arranged beside the strands of the first stage

Third Stage ̶ Horizontal strands

Fourth Stage ̶ Horizontal strands arranged beside the strands of the third stage


Fifth stage – Diagonal strand woven under the vertical strands and over the horizontal strands

Sixth stage – Begin the pattern in the empty corner on the transverse rail of the seat. Feed one end of the cane strand through the corner hole from the top-side to the under-side. Secure the strand-end in the usual manner. Secure the strand in the corner hole with a caning peg on the top-side.

Trim the working-end of the cane strand to create a sharp point. This makes weaving easier. Make sure the shiny side of the strand faces up and is not twisted. Start the weaving pattern by going under the diagonal strand next to the corner hole on the transverse rail of the seat. Then, weave over the first set of vertical strands in the pattern and under the first horizontal strands. Continue in this way (over the second set of vertical strands and under the second horizontal strands) until you reach the opposite transverse rail.

Make sure you weave under the diagonal strand on the transverse rail before threading the strand down through the hole. Pull the strand snug (but not tight) and secure the strand with a caning peg.

Continue with this pattern for each diagonal strand as you work toward the empty corner in the bottom transverse rail of the seat frame. As usual, the corner hole has two strands since it is both a hole along the transverse rail and the side rail. The strand going into the corner hole as part of the transverse rail strands weaves under the final diagonal strand before entering the hole. The second strand from the corner hole begins by weaving over the diagonal strand, then under the first set of horizontal strands and over the first set of vertical strands. Continue in the way until you reach the top transverse rail of the seat frame.
I rarely weave the Peterborough pattern. Consequently, I have to check and re-check my work constantly. I work slowly and carefully to ensure that my mistakes are made as quickly as possible.

Complete the sixth weaving stage at the corners of the seat. Make sure the strand weaves under the diagonal strand from the transverse rail and over the diagonal strand from the side rail.

Complete the seat weaving with the usual “couching” to cover the holes in the seat frame. The couching is held in place with loops of cane in every second hole around the seat frame.
Complete instructions on seat caning (and much more) are available in my book – This Old Canoe: How To Restore Your Wood Canvas Canoe.
If you live in Canada, CLICK HERE to buy the book.
If you live in the USA, CLICK HERE to buy the book.
If you live in the UK, CLICK HERE to buy the book.
Si vous habitez en France, CLIQUEZ ICI acheter le livre.
If you have read the book, please post a review on Amazon and/or Goodreads and/or any other review site.
by Mike Elliott, Kettle River Canoes
email: artisan@canoeshop.ca
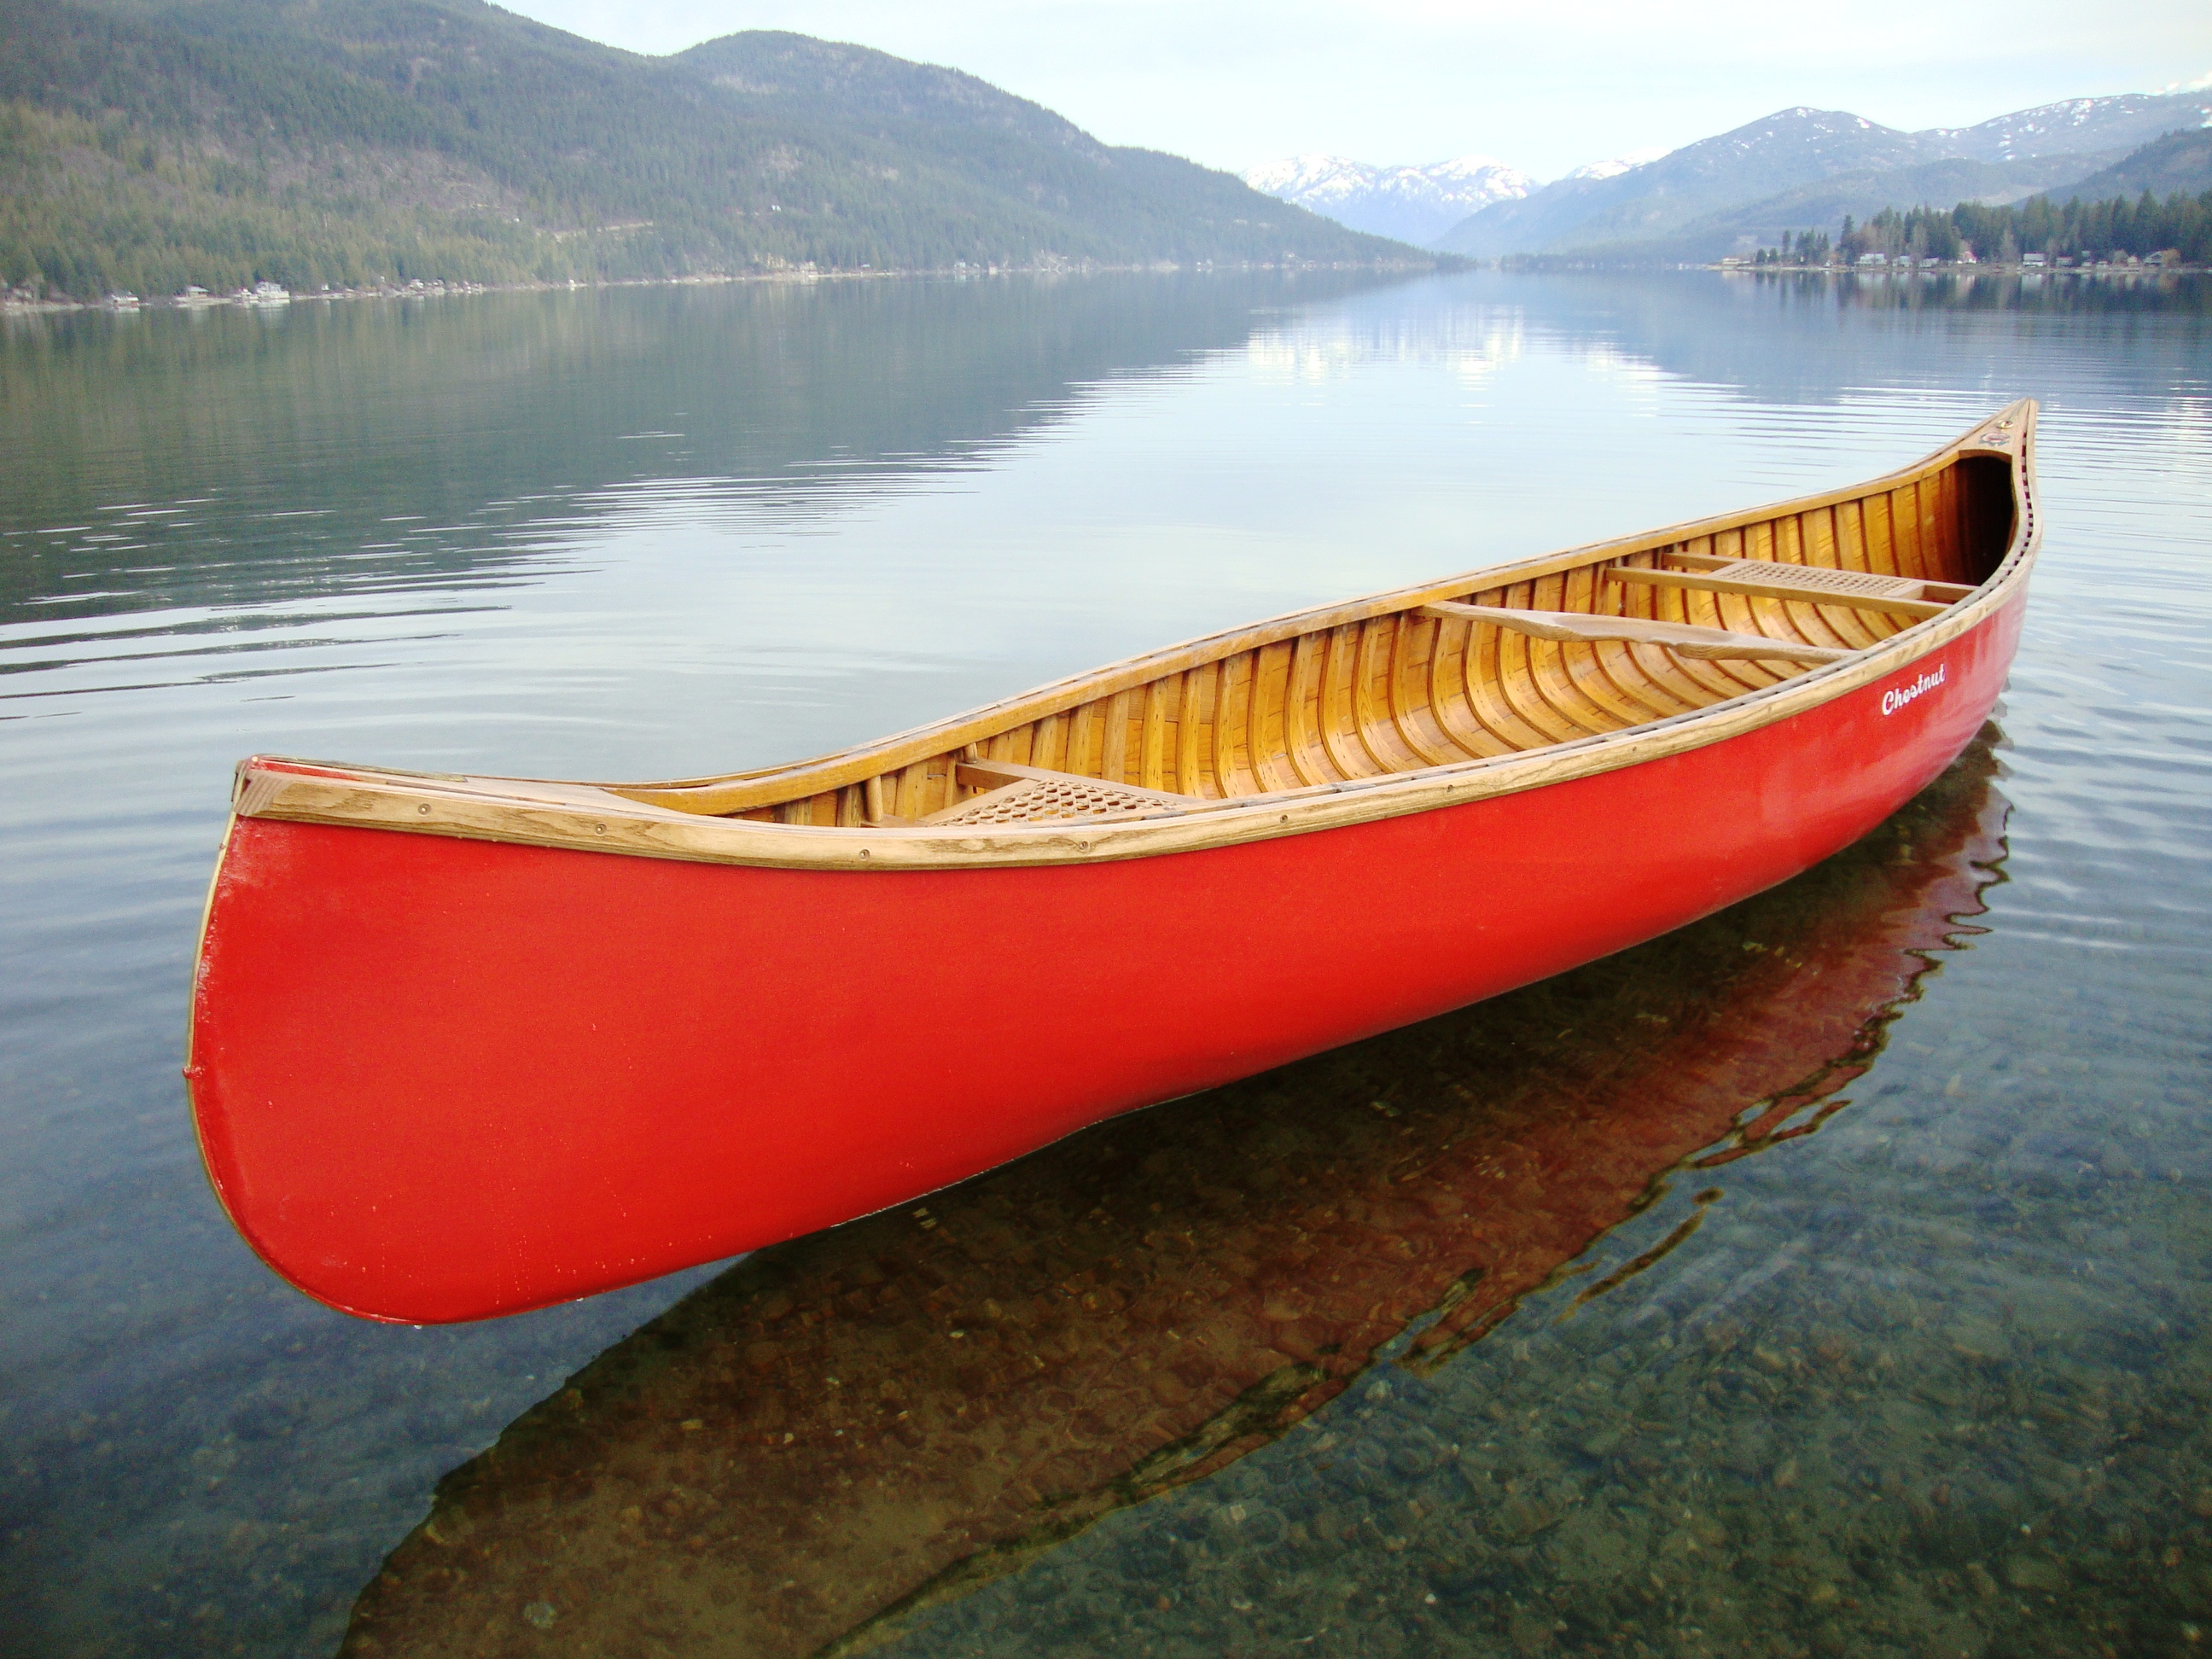
In Canada, the canoes from the Chestnut Canoe Company set the standard by which all others are measured. Now, forty years after the company went out of business, they are still held up as classic canoe icons. So, how can you identify a canoe as a Chestnut and what makes a Prospector a Prospector?
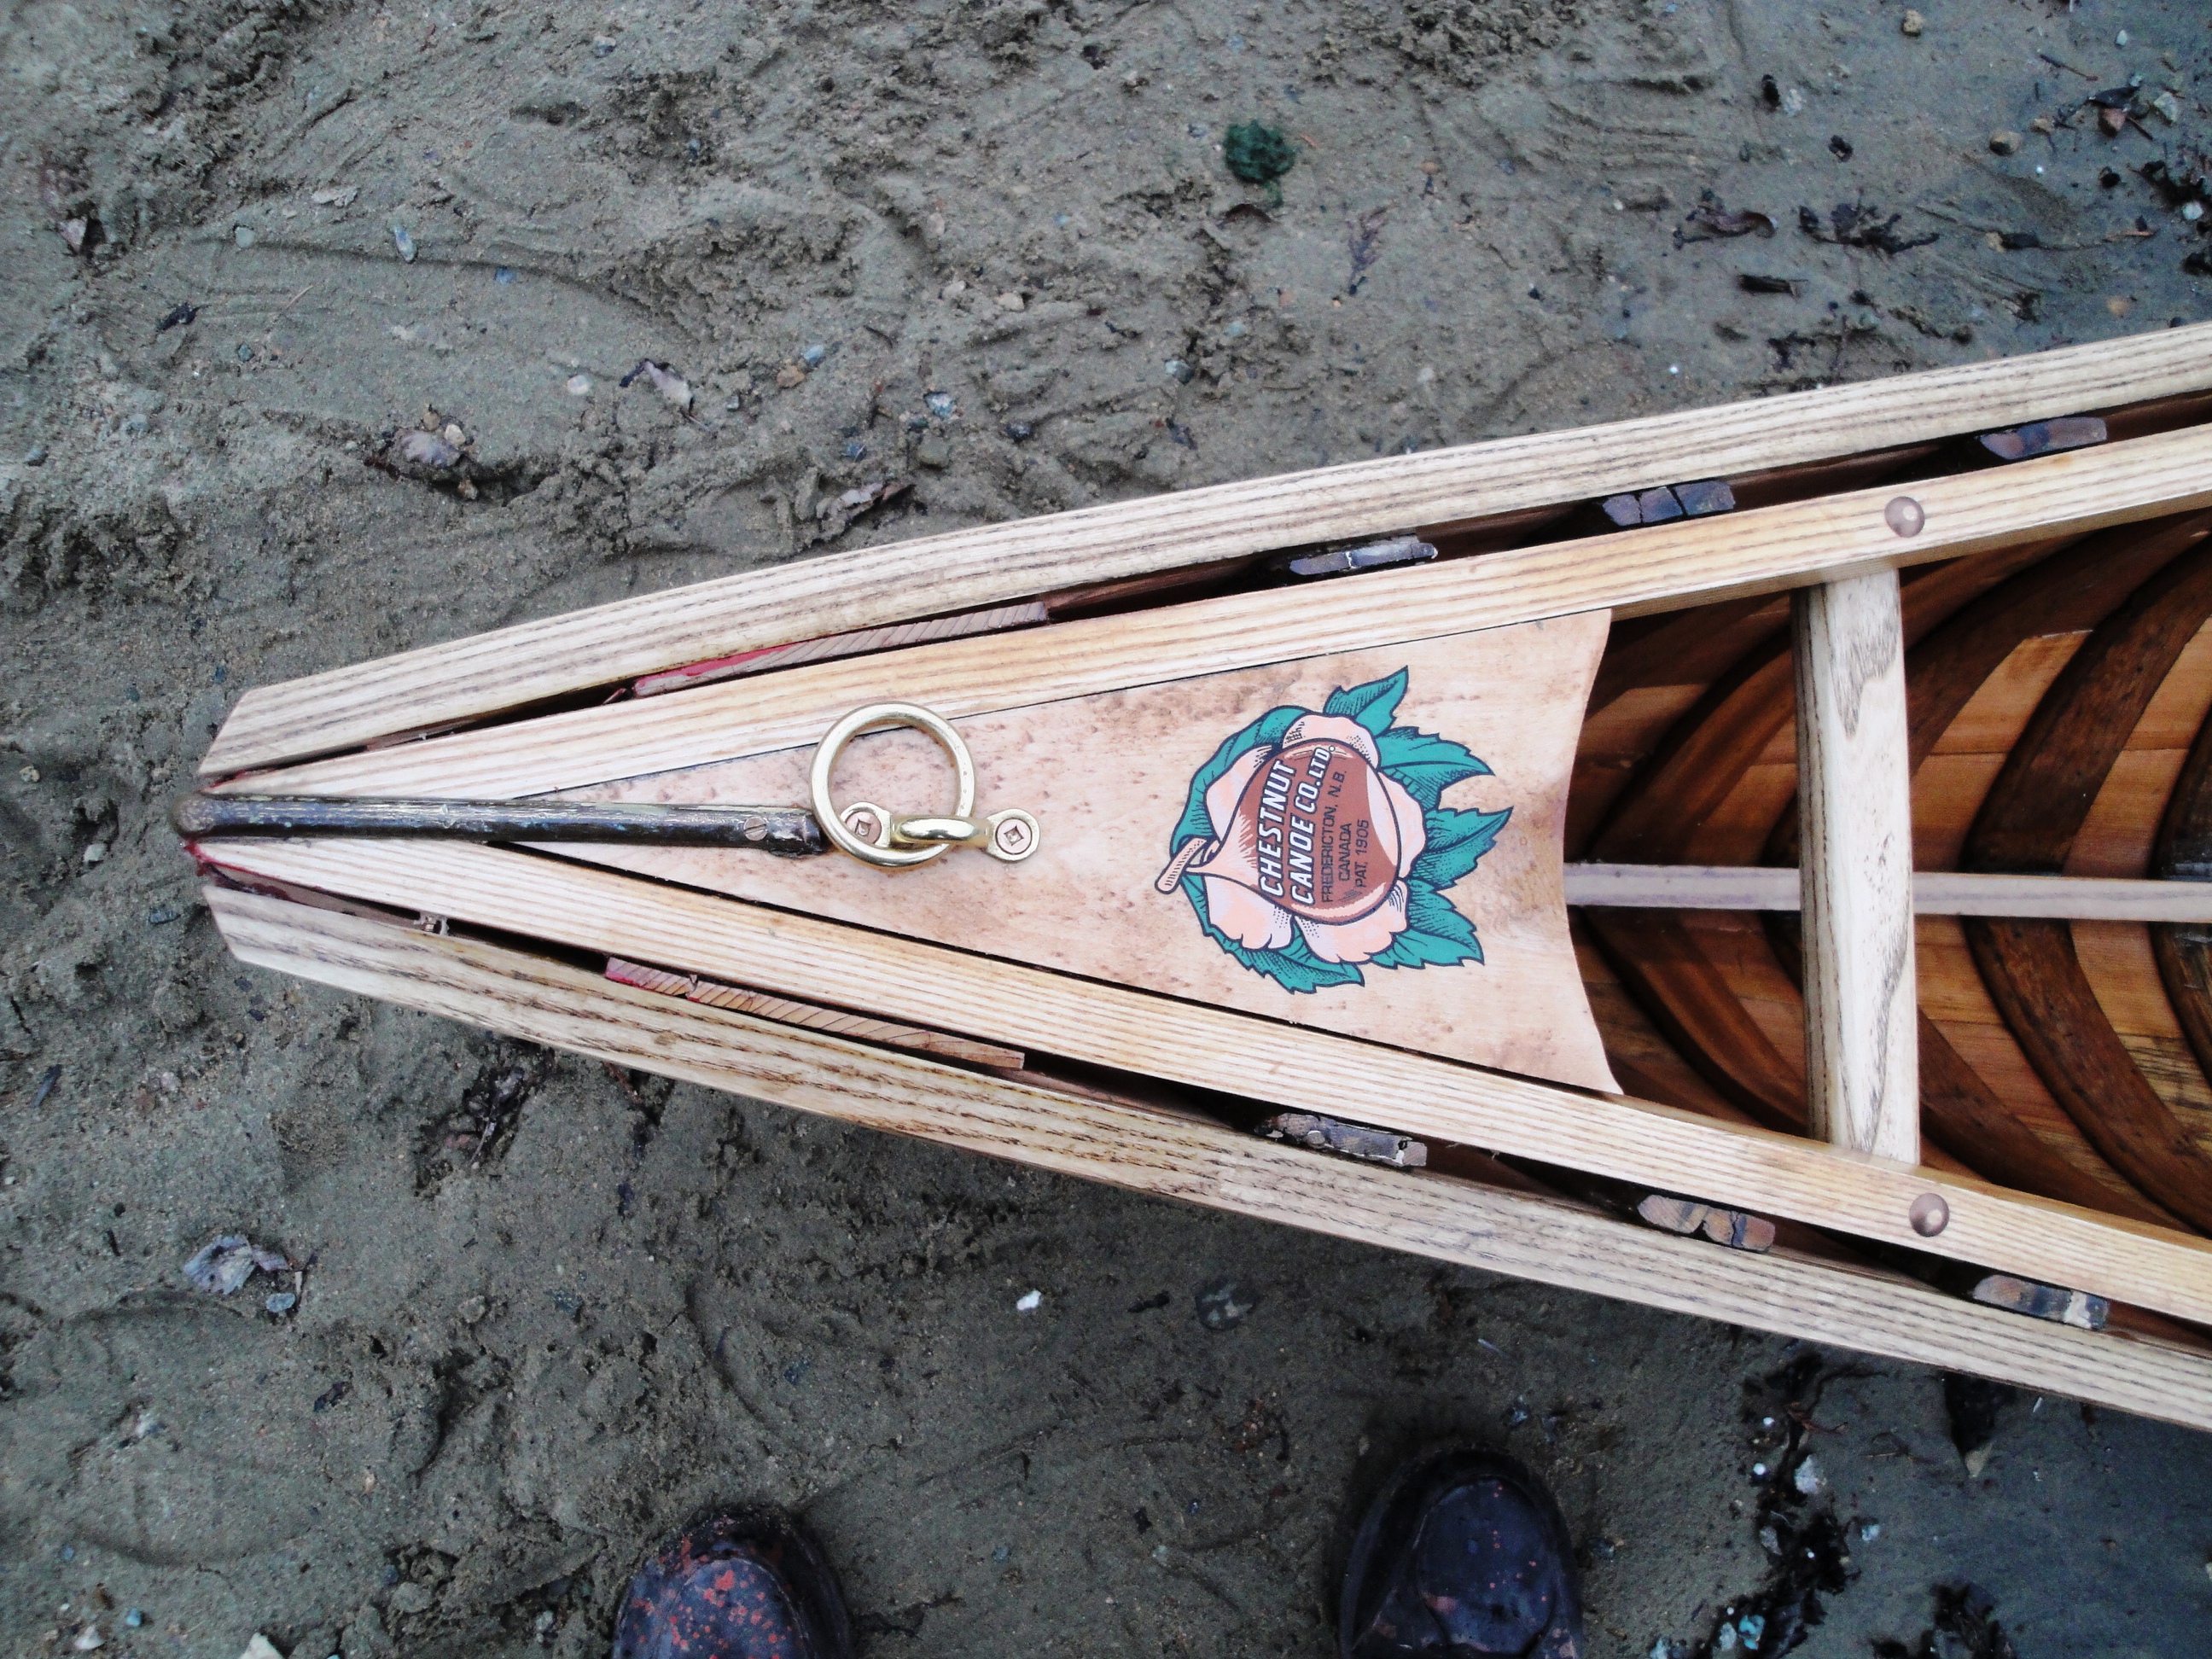
The Chestnut Canoe Company – William and Henry Chestnut started building wood-canvas canoes in 1897. They bought a canoe in Maine (probably a Gerrish canoe) and made exact copies of it which they then sold out of their father’s furniture business in Fredericton, New Brunswick. They incorporated the canoe business in 1905 which most historians view as the birth date of the company. However, the 1972 Chestnut Canoe Company catalogue proudly celebrated 75 years in business. It seems the company viewed its birth as 1897. Be that as it may, the company grew into the largest canoe manufacturer in Canada and, at their height, were producing in excess of 3,000 canoes/year. In 1923, Chestnut Canoe Company and Peterborough Canoe Company (and later Canadian Canoe Company) amalgomated under an umbrella group called Canadian Watercraft Limited. As a result, the wood-canvas canoes for all three companies were built in Fredericton by Chestnut. The Peterborough Canoe Company ceased operations in 1961 while the Chestnut Canoe Company continued until it closed in 1978.
Chestnut produced over 50 different canoes in a wide variety of models. In this article, I will focus on the most common Chestnut canoes — Ogilvy, Cruiser, Bobs Special, Pal and Prospector.

The Chestnut Ogilvy – Although never as popular as the others, fishing guides on the salmon rivers of New Brunswick helped create a working canoe that is unmatched for its purpose. They needed a river canoe they could stand up in all day long. They were often poling the canoe upstream through shallow rapids in order to offer the prime fishing spots to their clients. The canoe had to be stable and tough with a shallow draft so as to avoid many (but not all) of the rocks. They come in six models that range in length from 16’ to 26’ – real, honest working canoes.

The 16’ model has a 36” beam and 13½” depth at the centre. The ribs are 3” wide, 3/8” thick and have only ½” space between them. This creates what amounts to a double-planked hull. The rugged nature of the Ogilvy comes with a price in terms of weight. The 16’ has an average weight of 84 pounds and a carrying capacity of 850 pounds. It has a flat-bottomed hull, straight sides, full entry lines and modest rocker in the ends. This makes for a canoe that is slow and steady – exactly what is needed when moving through shallow, rapid rivers.

The Chestnut Cruiser – This canoe was one of the first canoes that Chestnut developed. It was influenced very heavily by (if not copied directly from) Gerrish canoes built in Maine in the late 1890’s. The lines are sleek, narrow and graceful – designed to handle rivers with speed and efficiency. This narrow canoe has an arched bottom, fine-entry lines and generous rocker at the ends. Therefore, it was not for the novice paddler. However, in the hands of someone who knows what to do, this canoe is a dream to paddle.

Three models are 16’ 17’ and 18’ long. The ribs are 2-3/8” wide, 3/8” thick with 2” spaces between the ribs. The 16’ model has a 34” beam, is 13” deep and weighs 70 pounds. They are also built with ribs 3” wide, 3/8” thick and ½” spaces between the ribs. These heavy-duty models are called the Guide Special. The 16’ model weighs 75 pounds. Both 16’ models have a carrying capacity of 600 pounds.

The Chestnut Bobs Special – This 15′ canoe is one of two lightweight pleasure canoes built by Chestnut. Before I talk about the canoe, I’d like to clarify the name. According to Roger MacGregor in his book “When the Chestnut was in Flower”, Henry and Will Chestnut were real history buffs. The telegraph code for the 15’ 50-Lb. Special was BOBS and made reference to Lord Roberts, a major figure during the Boer War in South Africa. Over the years, as this wide, light-weight canoe became more difficult to keep under the weight limit of 50 lbs (the average weight is 58 pounds while the carrying capacity is 700 pounds), they changed the name. I have seen a variety of Chestnut catalogues call it “Bob’s Special”, “Bob Special” and “Bobs Special”. So, feel free to take your pick.

Many outdoor enthusiasts were looking for a lightweight, stable canoe that would allow them to enjoy fly fishing or just a quiet paddle on the lake. With a 37” beam and 12½” depth at the centre, the Bobs Special is very stable — ideal for those who find a regular canoe too ‘tippy’. At the same time, it is surprisingly quick and maneuverable in the water. This is due to the shallow-arch bottom combined with moderate rocker and fine entry lines in the ends. The ribs are 2-3/8” wide and ¼” thick with 1½” spaces between them.

The Chestnut Pleasure Canoes – It is no accident that Bill Mason used a 16′ Chestnut pleasure canoe in most of his films. It is stable, yet quick; steady, yet agile. It has a 36” beam, 12¾” depth at the centre, weight of 72 pounds and a carrying capacity of 700 pounds. It is as close to being a perfect recreational canoe as you ever hope to get. It had a variety of names over the years and was one of the Chestnut pleasure canoes which also came in 14’ and 15’ lengths. Until 1958, the 16’ pleasure canoe (called the Ajax or Moonlight) had a 34” beam. Then, the mould was widened. The economy version of the 16’ pleasure canoe had been called the Pal for several years (from about 1954). The pleasure canoes came in both narrow and wide versions until about 1960 when the wider versions were adopted exclusively. Over the years, the ribs of the pleasure canoes came in two different sizes – either 1½” wide and 3/8” thick with 1½” spaces between ribs or 2-3/8” wide and 3/8” thick with 2” spaces. The 16′ was called the Pal or the Deer, the 15′ was called the Chum or the Doe and the 14′ was called the Playmate or the Fox.

The bottom has a shallow-arch hull with tumblehome extending through the entire length of the canoe. The fine entry lines and moderate rocker make it very easy to paddle. In his film, “Path of the Paddle: Solo Whitewater”, Bill Mason demonstrated very well that the Pal (or Deer) was not designed for Class 3 rapids. But, that didn’t stop him from trying. The Pal (or Deer) is a great general-purpose canoe and was the canoe of choice for many generations of canoeists – even if many of them called it a Chestnut Prospector.

The Chestnut Prospector – This is the real deal – often copied, never matched. A quick search on the internet produces at least ten modern canoe companies with a “Prospector” in its catalogue. However, the Chestnut Canoe Company invented this winning combination. With high sides, substantial arch in the bottom and lots of rocker in the full ends, it is designed to transport heavy loads quickly through rapid rivers and large, challenging lakes. It is essentially a deeper, wider Cruiser and is still regarded as the ultimate wilderness tripping canoe. Like the Cruiser, many people unfamiliar with these canoes find it a little “tippy”. The round bottom of the Prospector makes for a “shaky” feel when you first get in. However, it becomes much more stable as weigh is loaded into the canoe — making it perfect for extended trips. It also settles into a stable position when heeled over to one side. As a result, many people love it as a solo canoe.

They were made in five lengths from 14’ to 18’. The 16’ model has a 36” beam and a 14½” depth at the centre. The 16’ model weighs 76 pounds and carries 850 pounds. Although there is good tumblehome at the centre, the hull flares about 4’ from the ends in order to throw water away from the canoe while hitting big waves in rapid rivers. The ribs are 2-3/8” wide, 3/8” thick with 2” spaces between them.
All of this (and much more) is described in my book – This Old Canoe: How To Restore Your Wood Canvas Canoe.
If you live in Canada, CLICK HERE to buy the book.
If you live in the USA, CLICK HERE to buy the book.
If you live in the UK, CLICK HERE to buy the book.
Si vous habitez en France, CLIQUEZ ICI acheter le livre.
A Restorer’s Guide to Tremblay Wood-Canvas Canoes
July 22, 2018
by Mike Elliott, Kettle River Canoes
email: artisan@canoeshop.ca

Of the lesser known canoe manufacturers in Canada, Tremblay Canoes Limited (Les Canots Tremblay Limitée) from St. Félicien, Québec stand out from the crowd. They are well constructed with mahogany trim and their sweet lines make for a lovely paddling canoe.

The specifications I present here are for the standard line of canoes produced by Tremblay known collectively as the Chibougamau canoes. There were six canoes in the Chibougamau line ranging in length from 14’ to 20’. As in all of my blog articles presenting specifications for canoes, I do not present the lines for the hull. I am presenting specifications for anyone faced with the restoration of a Tremblay canoe. As such, it is not a builder’s guide but rather a restorer’s guide. Most of the dimensions can be taken from existing components in the canoe.

One little note here: I am listing all of the dimensions in inches. I apologize to all of you who are working in metric. The canoes were originally built with imperial measurements, so I find it easier and more accurate to stick with the original measurements.

One more note: In the later years of production, Tremblay canoes were known for their use of vinyl impregnated canvas (Verolite). Although a couple of canoe builders still use this material, I have yet to find a single canoe restorer who will touch the stuff. The vinyl coating acts as a plastic bag wrapped around the canoe and effectively holds water against the hull for extended periods of time. This lack of ‘breathing’ in the canvas cover results in extensive rot through many (if not most) Tremblay canoes that were paddled on a regular basis.

Inwales – Tremblay inwales are made of mahogany with nicely rounded edges. The ends curve sharply necessitating soaking the wood and heating the wood with hot water. This facilitates the bend through that section. I have repaired inwales that were cracked through the bend originally. Mahogany is temperamental at the best of times.

Outwales – The outwales are also mahogany, but being only 7/16” wide, they do not require heat-bending. For such a thin outwale, they are surprisingly robust. The 3/8” rabbet helps keep the piece stable.

Decks – Tremblay usually made their decks from birch or maple, but I have seen mahogany used as well. They are simple in design but nicely finished.

Stem-Top – It is unlikely you will ever have to replace the entire stem. However, I rarely see an original stem-top that is not partially or completely rotted away. The top of the stem-profile is straight thereby making the repair fairly straight-forward. The end assembly is held together with a 1½” #8 bronze wood screw.

Keel – If you want to keep the keel as part of the canoe, it is a simple piece to make. Use a piece of hardwood and taper each end gradually to ½” wide. It will accept the brass (or copper) stem-band which is ½” wide.

Ribs – The ribs are simple slats 3/8” thick and 2-1/8” wide. The edges are chamfered 10° on both sides with the top cornered rounded off slightly. There are 1¾” spaces between the ribs.

Planking – Tremblay did a nice job on the planking. The boards are usually 2¾” wide and 5/32” thick.

Seats – The seat frames are made of ¾” birch or maple that is 1-1/8” wide. Both seats are attached to mahogany braces on either side of the canoe with 1½” #8 bronze wood screws. The seats are approximately 2” below the inwale. The body of the seat is laced rawhide done the same way snowshoes were laced.

Thwarts – The thwarts are made of 5/8” birch or maple that is 2” wide. They are simple pieces with no taper. They are attached directly under the inwales with steel 10-24 bronze carriage bolts.

Portage Yoke – If present in your canoe, you will appreciate the lovely shape of this yoke. It is made of ash 5¾” wide tapering to 2¼” at the ends. Like most designs that are pleasing to the eye, it is also very comfortable to use.

Hand Thwarts – These are used as carrying handles on both ends of the canoe. They are positioned about 7” back from each deck. They are made from birch or maple 3/8” thick, 1½” wide and about 13” long with nicely rounded edges.

Here is a specification sheet with most of the components on one page.
All of this (and much more) is described in my book – This Old Canoe: How To Restore Your Wood Canvas Canoe.
If you live in Canada, CLICK HERE to buy the book.
If you live in the USA, CLICK HERE to buy the book.
If you live in the UK, CLICK HERE to buy the book.
Si vous habitez en France, CLIQUEZ ICI acheter le livre.
How to Get Information About Your Old Wooden Canoe
June 24, 2018
by Mike Elliott, Kettle River Canoes
email: artisan@canoeshop.ca
Fundamental to any canoe restoration is understanding what you are dealing with. This blog examines a number of ways to answer some basic questions:
1) Who built my canoe?;
2) When was it built?;
3) How was it built?;
4) What supplies and materials were used? and;
5) What did it look like originally?

Mike Wootton asked the WCHA about his Old Town canoe. It was built in 1937 and was shipped to Portland, Maine. The decks, thwarts and seats are oak, the gunwales are spruce and the canvas was painted dark green. He added the Old Town design number 1 as a finishing touch. He then showed it off at the 2016 spring meet of the Northwest Chapter of the WCHA.
WCHA – The first place I go for information about a new restoration project is the Wooden Canoe Heritage Association (http://www.wcha.org). They are an amazing resource. One of the things they do is to host an on-line forum. When you ask a question, there are often several people quick to respond with help, advise, guidance and historical information.

Mike Wootton asked the WCHA about his Old Town canoe (serial number 120233). They sent him a scan of the original build record. He used the information to complete the restoration.
Part of the forum is a build record search. They have archived a complete collection of Old Town, Carleton and Kennebec canoe company build records. If you have the serial number from your canoe, they will send you a scan documenting when it was build, the model, colour and style as well as to whom it was shipped.

(photo by the Canadian Canoe Museum)
Canoe Museums – The Canadian Canoe Museum in Peterborough, Ontario houses a collection over 600 vintage canoes and kayaks from around the world.

(photo by the Canadian Canoe Museum)
In addition, they house a large archive of canoe-related documents. It is worth becoming a member and spending the time to dig through their collections for the information you are looking for.

(photo by Jamie Dunn)
Another source of information is the Wisconsin Canoe Heritage Museum in Spooner. It has a small, yet comprehensive collection of primarily American-built antique canoes.

(photo by the Canadian Canoe Museum)
Both of these museums include workshop facilities and run regular classes teaching canoe restoration techniques. They can also connect you with canoe restorers who have experience dealing with specific types of antique canoe.
It is also worthwhile to venture into every small museum and gallery you come across in your travels. Old canoes often create a focal point in community collections. When you find a canoe you are looking for, ask the curator for permission to measure the canoe and take notes on its construction.

Old canoe company catalogues are sold regularly on ebay and other on-line sites.
On-Line Searches – Once you know the make and model of your canoe, it is often helpful to enter those words into on-line search engines. You never know what may happen to be available for a week or two. Written articles, blog posts and images from boat shows (to name a few) will be available on-line for a limited time. Check on a regular basis to see what is newly posted. Also, see what is being sold on ebay. There may be a listing for exactly the same canoe you are working on. Canoe catalogues are also sold regularly on ebay. If your canoe is an Old Town, and you known the year it was built, it is possible that the catalogue for that year is being sold on-line.

Catalogues – As you begin to plan your restoration, the canoe catalogue for your make, model and year can often provide a wealth of specific information about how your canoe was constructed, the woods used for the various components and perhaps examples of decorative designs painted on the canvas.
The WCHA has developed an impressive collection of historic canoe company catalogues for sale. From their on-line store, you can buy reprints of a wide variety of vintage canoe company catalogues (both Canadian and American). Large collections are also available on USB memory drives. These include: 1) a collection of 73 catalogues from 12 Canadian companies; 2) a collection of 50 Canadian and American companies; 3) a collection of every page of every Old Town Canoe Company catalogue from 1901 to 1993 and; 4) a collection of Thompson Brothers catalogues from 1907 to 1970.

The front cover of the 1978 catalogue for the Chestnut Canoe Company. My client designed the catalogue which turned out to be the last one ever produced.
The Last Chestnut (How research helped bring a canoe back to life) – In 2006, a client came to me with his Chestnut canoe which was in desperate need of restoration. He designed the 1978 catalogue for the company. When asked what he wanted in terms of payment, he requested they build an Indian Maiden canoe for him.

It had been almost 20 years since they last built that model. They found the building form buried in mud behind the factory. They rebuild it and decided to build a special edition series of 300 canoes. They worked out the process by building a prototype and then built the canoe for my client (a special plaque on the bow identifies it as 001 of 300). He took possession of the canoe directly from the factory in December 1978 and they closed the doors behind him. They were out of business.

When the canoe arrived in my shop, many components were missing and I had never seen another like it. In an on-line search, I found an article from the University of New Brunswick talking about a canoe that had been hidden away in the basement of a building on campus. The article identified it as a Chestnut Indian Maiden built in 1978. The university had just donated the canoe to the Wild Salmon Nature Centre in St. Andrews by-the-sea, NB.

My sister and her husband live in Maine about two hours drive from St. Andrews. I told them about my project and asked them to collect dimensions for a number of components on the canoe. They readily agreed and took on the research project as only two wildlife management PhD’s can. A couple of weeks later, I received a package full of photos, measurements, drawings and notes.

My restoration concluded successfully thanks to lots of research.

After publishing the story, I received an email from someone in Toronto. His brother had seen the Indian Maiden on display at the Canadian National Exhibition in the fall of 1978. Apparently, he was the only person to order one. The plaque on the bow identifies it as 002 of 300. To my knowledge, it is the last canoe ever built at the factory.
The entire canoe restoration process is described in my book – This Old Canoe: How To Restore Your Wood Canvas Canoe.
If you live in Canada, CLICK HERE to buy the book.
If you live in the USA, CLICK HERE to buy the book.
If you live in the UK, CLICK HERE to buy the book.
Si vous habitez en France, CLIQUEZ ICI acheter le livre.
The Evolution of Factory-Built Wooden Canoes
June 17, 2018
by Mike Elliott, Kettle River Canoes
email: artisan@canoeshop.ca

(photo by Nick Dennis)
Fundamental to any canoe restoration is understanding what you are dealing with. The scope of this blog is limited to factory-built wooden canoes held together with metal fasteners. More recent types of wooden canoe construction employing materials such as glue, fiberglass, resin, etc. will not be included. This blog presents a rough guide to the form and structure of factory-built wooden canoes and the ways in which they developed and diversified over time.
Since this blog concerns itself with the repair and restoration of antique canoes, I will not enter into an academic examination of canoe history. For that, I refer you to such books as: Canoecraft by Ted Moores and Merilyn Mohr (1983); The Wood & Canvas Canoe by Jerry Stelmok and Rolin Thurlow (1987); The Canoe: A Living Tradition by John Jennings (2002) and; Canoes: A Natural History in North America by Mark Neuzil and Norman Sims (2016). Instead, I will present the evolution of factory-built canoes with an emphasis on the variety of construction methods employed.
Dubbed Copper Nail Construction
In Ontario, Canada in the mid-1800’s, a number of boat builders in the region in and around Peterborough were experimenting with canoe construction methods. Their ideas were influenced by the dugout canoes in the region. They built their canoes over a solid wood form (perhaps using a dugout canoe as the basic shape). They employed many building techniques borrowed from European boatbuilding traditions to create all-wood canoes with no exterior waterproof cover.


Rib-and-Batten – By 1859, John Stephenson and Tom Gordon were producing canoes using a ‘rib-and-batten’ method. A keelson (usually made of white oak) is set into the form. Notches are cut along the length of the keelson (at 4½” or 11.4 cm centres) into which half-round rock elm ribs (about 5/8″ or 16mm wide) are set and steam-bent over the form. Wide-board planks (made of basswood or Spanish cedar) are bent over the form on top of the ribs and are held in place with 16-gauge copper nails. Pilot holes are drilled through the planks and ribs. Then, the nails are driven straight into the solid wood form. Once this is done for the entire canoe, it is pulled off the form and turned right-side up. A chunk of iron shaped specifically for the purpose (called a dubbing iron) is used to bend the nails along each rib with the points oriented toward the keelson in a process called ‘dubbing over’. The dubbing iron is then used as backing against each rib while each nail is hammered flat into the wood with a cobblers hammer. The wide-board planks run longitudinally the length of the canoe and are placed against each other with butt joints. These joints are covered with battens on the interior which are also attached with dubbed copper nails. ‘Labour-intensive’ is a mild way of describing this process. A 16′ (4.9 meter) canoe is held together with approximately 4,000 nails.

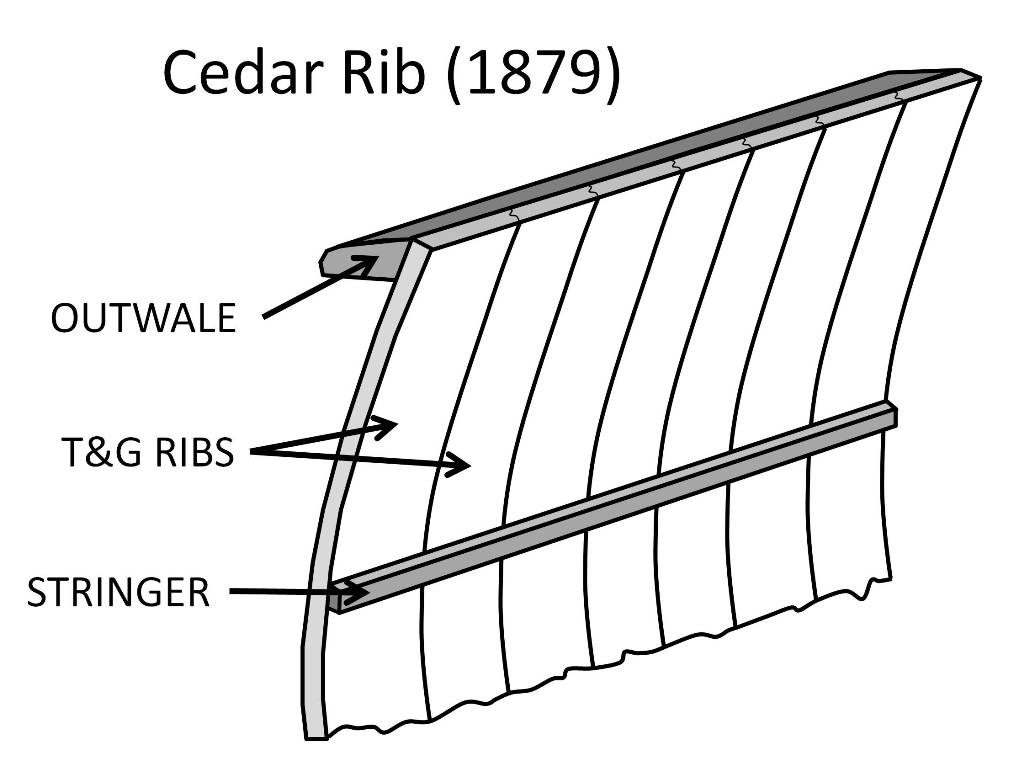
Cedar Rib – In 1879, John Stephenson patented the ‘cedar-rib’ canoe construction method. White cedar ribs are steam-bent over a solid wood form and are fitted tightly together with tongue-and-groove joints. Once completed, the canoe is disassembled in order to remove it from the form. It is then reassembled and held together with a number of stringers running longitudinally. The stringers are attached to the ribs with copper nails which are dubbed over and flattened in the usual fashion. As we looked at one of these canoes at the Canadian Canoe Museum, Jeremy Ward, the museum curator, said, “I want to build one of these just to prove it can’t be done.”


Longitudinal Strip – John Stephenson continued his design efforts with a third construction method patented in 1883. This method starts by bending the half-round rock elm ribs over the solid wood form at 3″ (76 mm) centres (notched into the keelson). Then, longitudinal strips of edge-grain white cedar are placed on top of the ribs and are fitted together with shiplap joints. These strips are 2″ (51 mm) wide in the centre of the canoe and are tapered by hand to about 1¼” (32 mm) at the ends. Again, dubbed copper nails are used to hold the entire canoe together. Over time, this method emerged as the standard for what became known as the “Peterborough” canoe.


Flush Batten – The rib-and-batten method was refined by William English with the introduction of his patented ‘flush batten’ construction method in 1888. His method begins in the usual way with half-round rock elm ribs steam-bent over a solid wood form (notched into the keelson at 4½” or 11.4 cm centres). Wide, white cedar planks with rabbeted (rebated) edges run longitudinally on top of the ribs. Thin rock elm battens are set into the channels formed by the rabbeted edges. These battens sit flush with the interior edges of the planks. As usual, the entire canoe is held together with dubbed copper nails. This construction method was widely used in racing canoes.
**************

(photo by Nick Dennis)
All of these construction methods rely on expert craftsmanship and tight joints to produce watertight canoes. Once it has been sitting in water for a day or two, the wood in the canoe swells and the joints become very tight indeed. That said, a large sponge is a standard piece of equipment in these canoes.
Clinched Tack Construction


Double-Plank – Dan Herald was another of the inventive canoe builders in the Peterborough region of Ontario. He patented his ‘double-plank’ construction method in 1871. This method employs a solid wood form sheathed with metal. White cedar planks are steam-bent transversely (from one side of the canoe to the other) and are fitted together with butt joints. Next, cotton muslin or canvas soaked in pine tar is laid on top of the first layer of planks. The treated cloth helps waterproof the canoe. The next step in this method is to place a second layer of thin, white cedar planks onto the form. These planks run longitudinally and are attached to the first layer of planks with small, thin copper tacks (later simply referred to as ‘canoe tacks’). The tacks are driven into the wood with a cobblers hammer. They hit the metal sheathing on the form and curl back on themselves to clinch the wood together.


Capped Gunwale – A number of salmon fishing guides and canoe builders lived and worked along the Penobscot River in Maine in the late 1800’s. They worked with and often built birch bark canoes. They had become used to using canvas (waterproofed and painted) to cover their canoes and keep them watertight. It appears they heard about Dan Herald’s double-plank construction method in the mid- to late 1870’s and started adapting his ideas to create canoes emulating the birch bark canoes in their region. They began building their canoes over solid wood forms sheathed with strips of metal. White cedar ribs (about 2″ or 51 mm wide and 5/16″ or 8 mm thick) are steam-bent over the metal strips on the form. No keelson is used since birch bark canoes do not employ this feature. White cedar planks run longitudinally on top of the ribs and are fitted together with butt joints. The planks and ribs are held together with copper canoe tacks that clinch when they hit the metal strips upon which each rib is bent. The ends of the ribs are attached to hardwood (usually ash) inwales – another feature of birch bark canoes. To emulate the look of bark canoes, the ends of the ribs are either tapered and attached against a chamfered edge of the inwale or they are set into pockets carved into the inwale (usually with a forstner bit). Once most of the canoe is completed, it is removed from the form and turned right-side up. Then, the stems and decks are installed and the hull construction is completed. Canvas is then stretched over the hull and held in place with canoe tacks. Next, the canvas is waterproofed with a canvas filler and trimmed along the sheer-line. The look of a bark canoe is completed with the attachment of thin hardwood caps on top of the inwales and thin hardwood outwales used to cover the top edge of the canvas. Evan H. Gerrish has been acknowledged as the first canoe builder in Maine to use this method. Others quickly followed. Among them were Edward M. White, Bert N. Morris and Guy Carleton.


Double Gunwale – By the 1890’s, the look of the gunwales was refined with the development of the ‘double gunwale’ system. The tops of the ribs are still set into pockets in the inwales but the gunwale-cap is no longer used. Instead, the outwales are widened to look very much like those found on canoes built in Ontario. This results in a very elegant look to the gunwales.


Open Gunwale – Bark canoes are held together with tension as the ribs are hammered into place thus wedging the rib-tops between the inwales and outwales. Each fall, the ribs are hammered out of position and the canoe is stored away for the winter. In factory-built canvas-covered canoes, the rib-tops are held permanently inside pockets cut in the inwales. Over time, water is held in the pockets and the moist environment is perfect for the growth of the fungi that cause wood rot. Around 1905, builders developed the ‘open gunwale’ system. This allows water to drain quickly from the canoe and keep the rib-tops rot-free for a longer time. By the mid-19-teens, the entire canvas-covered canoe industry had adopted this system.
The entire canoe restoration process is described in my book – This Old Canoe: How To Restore Your Wood Canvas Canoe.
If you live in Canada, CLICK HERE to buy the book.
If you live in the USA, CLICK HERE to buy the book.
If you live in the UK, CLICK HERE to buy the book.
Si vous habitez en France, CLIQUEZ ICI acheter le livre.
by Mike Elliott, Kettle River Canoes
email: artisan@canoeshop.ca
Peter and Christ Thompson built wood-canvas canoes in Peshtigo, Wisconsin (about 50 miles north of Green Bay) as the Thompson Brothers Boat Manufacturing Company. The company built canoes from 1904 until 1962.

The specifications I present here are for the Ranger model ̶ a 16′ canoe designed for general recreational use. As in all of my blog articles presenting specifications for canoes, I do not present the lines for the hull.

That said, the hull has a shallow-arch bottom with lots of tumblehome through the full length of the canoe. The ends have very little rocker and are quite full. I am presenting specifications of component parts for anyone faced with the restoration of a Thompson Bros. canoe. As such, it is not a builder’s guide but rather a restorer’s guide. The specifications for various components changed over the years, so if possible, base your dimensions on those of the original piece from your canoe.

One little note here: I am listing all of the dimensions in inches. I apologize to all of you who are working in metric. The canoes were originally built with imperial measurements, so I find it easier and more accurate to stick with the original measurements.

One more note: You may notice that the two canoes featured in this article do not have external stems. Although they came into the shop with external stems, the clients did not want the keel re-installed. Without a keel, the external stem is out-of-place.

Inwales – Thompson Ranger inwales are made of mahogany with chamfered edges. The ends are tapered to ½”. The sheer-line of the Ranger is flat with no rise at the ends. Therefore, the gunwales do not require any pre-bending.

Outwales – The outwales are also mahogany and are well rounded making for a comfortable and good-looking rail on the canoe.

Decks – Thompson Bros. decks were originally made of softwood (probably spruce) with a metal strap secured across the underside for extra stability. When faced with the task of replacing the decks, I chose to use maple which foregoes the need for a metal strap.

Stem-Top – It is unlikely you will ever have to replace the entire stem. However, I rarely see an original stem-top that is not partially or completely rotted away. The top of the stem-profile is straight thereby making the repair fairly straight-forward. The end assembly is held together with a 1½” #8 bronze wood screw. The external stem is attached with the same 1½” #8 bronze wood screws.

Keel – If you want to keep the keel as part of the canoe, it is a simple piece to make. Use a piece of hardwood (originally white oak) and taper each end gradually to join smoothly with the external stem. Since the external stem protects the canvas seam at the ends, there is no need for brass stem-bands.

Ribs – The ribs are 5/16” thick and 2¼” wide. The edges are chamfered 15° on both sides with the top corners rounded off slightly. The ribs are tapered to 1¼” wide at the tops. One distinctive feature of Thompson Bros. canoes is clipped corners on the rib-tops.

Planking – The planking is another distinctive feature of Thompson Bros. canoes. The boards are usually 3¾” wide, 3/16” thick and beveled to make for a very tight fit.

The planking pattern also identifies Thompson Bros. canoes. The sheer planks run straight from end-to-end. The bottom planks run up to the sheer planks and are cut to form a sharp point near the ends of the canoe.


Seats – The Ranger was built either with hand-woven cane in white oak frames or with extra thwarts placed where the front edge of the seats would normally be located. If present, the seats are woven with standard warp and weft weaving in the six-stage pattern. The bow seat is hung from the inwales with 10-24 carriage bolts and solid blocks of mahogany as spacers. The front edge of the stern seat is attached directly under the inwales while the back edge has ¾” hardwood dowels as spacers.

Thwarts – The thwarts are made of 7/8” white oak that is 2-1/8” wide. They are shaped with tapers for hand-grips and are nicely rounded but not elegant. Canoes built for use at summer camps were set up with four thwarts and no seats. Presumably, this avoided the need to repair or replace seats two or three times a season due to the inevitably heavy wear-and-tear from hundreds of kids at the camps.


Here are specification sheets with most of the components presented together for easy reference.
The entire canoe restoration process is described in my book – This Old Canoe: How To Restore Your Wood Canvas Canoe.
If you live in Canada, CLICK HERE to buy the book.
If you live in the USA, CLICK HERE to buy the book.
If you live in the UK, CLICK HERE to buy the book.
Si vous habitez en France, CLIQUEZ ICI acheter le livre.
by Mike Elliott, Kettle River Canoes
email: artisan@canoeshop.ca
If you are preparing to restore your wood-canvas canoe – especially in Canada – you are often looking at a canoe built by the Chestnut Canoe Company based in New Brunswick from 1897 to 1978. Of the many models produced over the years, the 16′ Pleasure Canoe was one of their best sellers. It had a variety of names and the hull shape changed as well over the course of eighty years. However, this canoe is most commonly referred to as the Chestnut Pal.

The dimensions of the components that make up the Pal are often the same as those found in many other Chestnut (and Peterborough) canoe models – including the famous Chestnut Prospector. As a result, if you have these dimensions, you can use them to restore about thirty different canoe models. So, here is a restorer’s guide to the Chestnut Pal.

This Chestnut pleasure canoe is from around 1952. The telegraph code was Ajax. It was 16′ LOA and had a 34″ beam.
The 16’ Pleasure Canoe from the Chestnut Canoe Company had a number of incarnations over the years. From the early 1900’s until 1953 it had a 34” beam, its ribs were 1.5” wide and was called the Ajax. Then the beam was widened to 36” and it was called either the Pal (1954 – 1978) or the Deer (1965 – 1978). Through the later years, the ribs were either 1.5” wide or 2-3/8” wide.

One little note here: I am listing all of the dimensions in inches. I apologize to all of you who are working in metric. The canoes were built with imperial measurements originally, so I find it easier and more accurate to stick with this measurement scale.

Inwales –The inwale is a length of ash 15/16” high. It is fashioned to fit the tumblehome present on most Chestnut canoes. Therefore, the top surface is ¾” wide while the bottom width is 7/8”. The last 15” or so at each end is tapered down to about 5/8” wide along the sides of the decks. All of the transverse components (thwarts and seats) are attached to the inwales with 10-24 (3/16”) galvanized steel carriage bolts. I replace these with 10-24 silicon-bronze carriage bolts.

Outwales – The outwales are also made of Ash. Depending on when the canoe was built, the outwales may have a chamfered edge on the bottom of the outside surface. Water often gets trapped under the outwales and results in rot on the inside surface. Therefore, I usually end up replacing this component and I make sure I seal all of the surfaces with shellac and varnish before installing the outwales. The sheer-line of Chestnut and Peterborough Pleasure Canoes turns up sharply about 18” from the end. As a result, it is necessary to soak, heat and pre-bend new inwales and outwales over custom-built forms to make the ash fit the upswept sheer-line.
It is also worth noting that both the inwales and outwales were very often made by joining two pieces together with a 9″ scarf joint to create the full length Ash required. Apparently, it was difficult to get full length Ash even in the 1960′s.

Decks – The decks were made of hardwood – usually maple, ash or oak. By the time you start restoring your canoe, the decks are often rotted along with the stem-tops and inwale-ends. They are attached to the inwales with six 2” #8 bronze wood screws. The deck extends about 15” into the canoe from the end.

Stem-Top – You will rarely if ever have to replace the entire stem. However, I rarely see an original stem-top that is not partially or completely rotted away. Because the top 6” or so of the stem is straight, you can usually make the repair without having to pre-bend the wood to fit the original stem-profile.

Keel – If you want to keep the shoe keel as part of the canoe, it is a simple piece to make. Use a piece of hardwood (the original was ash) and taper each end to 3/8” wide. The overall length is about 14’. It will accept the brass stem-band which is 3/8” wide.

Ribs – The Chestnut Pleasure Canoes were constructed with either the regular 2-3/8″ wide ribs or the narrow 1½” wide ribs. Both of these rib types are 3/8″ thick.

The edges of the narrow ribs are chamfered 18° on both sides with the top corners rounded off slightly. The edge of the regular rib closest to the centre of the canoe has tapered ends (11° chamfer) while the edge closest to one end of the canoe is chamfered about 30°. The chamfer angles varied over the years, so you will have to use the original ribs in your canoe as templates. There are 2” spaces between the regular ribs and 1½″ spaces between the narrow ribs.

Planking – The planking in Chestnut Canoes was made of either Eastern White Cedar or Western Red Cedar. They started out being 5/32″ thick, but were often sanded down from there. I often have to pass new planking through the thickness planer to match the thickness of the original planks.

Seats – The seat frames are made of ¾” hardwood (ash, oak or maple) 1½” wide and hand-caned seats. Both seats are suspended under the inwales with 10-24 carriage bolts and held in position with 5/8” hardwood dowel. The rear stern seat dowels are 1¾” long while the front dowels are ¾” long. All of the bow seat dowels are ¾” long. Again, this varied over the years. When re-installing seats, I tend to use 1¾” spacers for the bow seat. The stern spacers are then 1¾” and 2¾”. This adds a noticeable degree of stability to the canoe. The forward edge of the bow seat is 58” from the bow-end of the canoe while the forward edge of the stern seat is 38½” from the stern-end of the canoe.

Thwarts – The thwarts are made of ¾” hardwood (ash, oak or maple) that is 2½” wide. They taper from the centre to create hand-grips on either side that are 2” wide. They were attached directly under the inwales with galvanized steel 10-24 carriage bolts. Usually, the original carriage bolts are corroded and must be replaced. I use 2″ 10/24 silicon bronze carriage bolts. The stern-quarter thwart is positioned 67” from the stern-end of the canoe while the centre thwart is positioned 96” from both ends.
All of this (and much more) is described in my book – This Old Canoe: How To Restore Your Wood Canvas Canoe.
If you live in Canada, CLICK HERE to buy the book.
If you live in the USA, CLICK HERE to buy the book.
If you live in the UK, CLICK HERE to buy the book.
Si vous habitez en France, CLIQUEZ ICI acheter le livre.
Bill Greenwood and his Wood-Canvas Canoes
March 18, 2018
by Mike Elliott, Kettle River Canoes
email: artisan@canoeshop.ca

Unless you live in British Columbia, you have probably never heard of Bill Greenwood or Greenwood canoes. And if you want to start a fight amongst wood-canvas canoe enthusiasts, just ask them to name the prettiest canoes ever made. In Maine, you would hear names like Morris, Gerrish and White. In Ontario, Peterborough canoes are top of the list. But in British Columbia, people speak about Greenwood canoes in hushed tones and bow down to Bill Greenwood’s exquisite water craft.

There is some information available about Bill or his canoes. There is a website devoted to Bill, his company and his family. Checkout greenwoodcanoecompany.com
The information presented here has been collected from people who bought their canoes directly from the builder at his shop as well as some anecdotes from Jim Kinzell, who worked with Bill as an apprentice from 1969 to 1975. Dave Lanthier from Kamloops gave me a small biography produced in 1972 as an assignment for a physical education course at a college. My information is incomplete. That said, Bill Greenwood and Greenwood Canoes deserve recognition in the world of wood-canvas canoes.

As I understand it, Bill was born in 1912 and was an active outdoorsman who loved hiking, skiing, canoeing — just about anything that got him outside. Then, he suffered a stroke while hiking in the mountains. He was 24 years old. As part of his rehabilitation, Bill decided to learn how to build canoes. He boarded a train in Vancouver, BC and made his way to Old Town, Maine. He hung around the Old Town Canoe Company shop and absorbed everything he could about canoe building until they realized what he was doing and kicked “the spy” out. Bill spent some time at other canoe factories including the Peterborough Canoe Company in Ontario before returning to British Columbia and setting up Greenwood Water Craft Company. The shop location changed a number of times over the years until he established a large shop complex on Mitchell Island in Richmond, BC in the late 1960′s.

Not surprisingly, the lines and details of Greenwood Canoes borrow heavily from the “Maine Guide” canoes of Old Town and other builders in Maine. They all sport wide, flat bottoms and have very little rocker. The stem profile is heavily curved (often forming a complete half-circle) and the hulls all contain a lot of tumblehome. Bill’s 16’ (4.9 meter) canoes did not have a centre thwart, but instead had both bow- and stern-quarter thwarts as was typical of Maine Guide canoes. Many of the canoes had bottoms reinforced with half-ribs between the main ribs to create a strong comfortable floor. And Bill absolutely refused to make a canoe without a keel. In fact, one of my clients asked Bill to leave the keel off the canoe he was ordering. Apparently, Bill said something like, “My canoes have keels.” When my client told Bill that many Chestnut Canoes paddled very well without a keel, Bill said, “If you want a Chestnut canoe, then buy a Chestnut canoe.” My client told me that story while I was preparing the restoration work order on his 17’ (5.2 meter) Chestnut Cruiser.

The workmanship in Greenwood canoes is outstanding. He used “aircraft quality” Sitka Spruce for the double-tapered ribs. The 4″ (10 cm) wide planking was made of air-dried, quarter sawn (edge grain) old-growth Western Red Cedar. Following the tradition at Old Town canoes, the planking is perfectly tight with absolutely no gaps. The stems (and slat seats) were White Oak while the rest of the canoe was trimmed in Philippine Mahogany (Luan). All of the woodwork was flawless – graceful lines and elegant detailing. The one drawback in many Greenwood canoes built in the early 1970’s is the fact that he used steel screws to attach the mahogany outwales. Apparently, Bill was feuding with one of his suppliers. He wanted 1.5” (37 mm) #8 brass wood screws in lots of 1,000 while the supplier insisted on selling lots of 10,000. Bill ordered steel screws from another supplier in lots of 1,000. I have had to cut that beautiful mahogany into hundreds of tiny pieces because the steel screws had corroded to the point of being fused into the wood. I’m sure Bill thought he had won the war with his supplier, but it has made the restorer’s job much more difficult 40 years later.

The quality of the workmanship is all the more impressive when you consider the fact that Bill worked almost entirely with one hand. The stroke affected his left side. Consequently, his left hand was crippled to the point that he had limited use of it. His daughter, Susan, told me that Bill referred to his left hand as “Duddy” – his dub of a left hand. My understanding is that he used jigs for almost every step of production. That and a few very good assistants in the shop (including George Fletcher and Jim Kinzell) made it all work beautifully.

Greenwood Canoes came in lengths from 15’ (4.6 meter) to 18’ (5.5 meter). He had two basic models – the Pleasure Model (12” – 30 cm – deep) and the large volume Prospector Model (14” – 36 cm – deep). He built a full range of lengths in both models (as well as a 12′ car-top boat) until 1970. One client of mine has a beautiful home in North Vancouver overlooking the entire Lower Mainland. He had ordered a canoe from Bill in 1970 and was expecting a call any day to say that the canoe was ready. Then, he heard a news report of a large fire on Mitchell Island in Richmond. He looked out over the valley from his home and saw a big cloud of smoke. The Greenwood Water Craft shop was engulfed in flames. The next day, my client went to the site and saw Bill kicking through the ashes that used to be his shop. He said, “I only had time to grab two canoes. The yellow one over there — that’s yours.”

Bill rebuilt the business with a limited number of moulds and continued building canoes until he sold the business in 1975. According to Doug Ingram of Red River Canoe and Paddle, the moulds ended up in Cranberry Portage (a small community in Northern Manitoba east of Flin Flon). Apparently, they were never used again and are now in very poor condition. Bill died in 1979. His contribution to the world of wood-canvas canoes is significant here in British Columbia. People bow their heads in reverence to these stunning works of art.
All of this (and much more) is described in my book – This Old Canoe: How To Restore Your Wood Canvas Canoe.
If you live in Canada, CLICK HERE to buy the book.
If you live in the USA, CLICK HERE to buy the book.
If you live in the UK, CLICK HERE to buy the book.
Si vous habitez en France, CLIQUEZ ICI acheter le livre.

