How To Store A Wood-Canvas Canoe
August 12, 2018
by Mike Elliott, Kettle River Canoes
email: artisan@canoeshop.ca
Proper storage of your wood-canvas canoe is essential to its long, rot-free life. The basic principles of proper storage revolve around creating an environment that is hostile to the growth of the fungi that cause wood to rot. This means keeping the canoe:
a) well off the ground
b) upside-down
c) protected from rain, snow, etc.
d) in an area with lots of air circulation
Finding a suitable place is often a major challenge. I’m sure there are as many places to store a canoe as there are canoes. Let’s look at a few.
Some examples of suitable storage spaces include:
1) Carport
2) Covered Porch
3) Unheated Garage
4) Lean-To Shelter (against a building).
Once you have identified a spot, the next step is to develop a storage method. I will describe three possible systems. From them, you ought to be able to come up with something that works for you.

1. A Basic Rack – Does your space have a solid wall on one side? Is there enough room away from the wall to allow access into the space? If so, build and install two large racks about 7’ (2 meters) apart. The example illustrated here is made from spruce 2×4’s. The joints are glued and screwed to ensure a sturdy structure. The top edges of the rack can be rounded and/or padded to protect the gunwales of the canoe. Make sure the racks are secured well to the wall (with lag-bolts or through bolts and washers).

If you are able to use the services of a steel fabricator, a canoe rack can be constructed from 1″ (25 mm) square tubing. A single weld to create a right angle is more than strong enough to support a canoe, so there is no need for extra bracing if the rack is made of steel. Protect the gunwales of your canoe by threading a length of 1½” (38 mm) ABS pipe over the steel struts.


2. A Roller System – Is your space long and narrow? Is it awkward or impossible to access the space from the side? In this case, it may be possible to feed the canoe into the space from one end. For this situation, install two support racks about 7’ (2 meters) apart. Each support rack is a length of standard 1” (25 mm) steel pipe (or square tubing) at least 40” (one meter) long threaded through a length of 1½” (38 mm) ABS pipe at least 38” (96 cm) long. Install each steel pipe securely at the desired height. The ABS pipe acts as a roller and makes it easy to store the canoe in and remove it from a confined space.
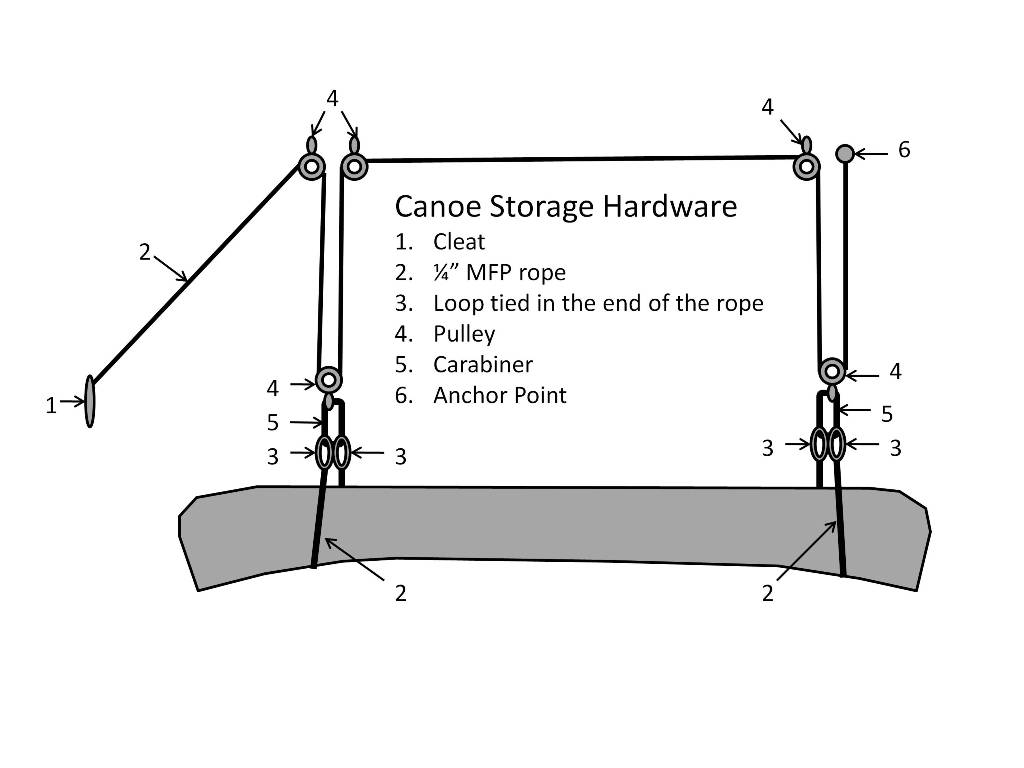
3. A Hoist System – Is it possible or desirable to get your canoe up out of the way above everything else? If so, try using a system of ropes and pulleys to hoist your canoe up and away. Support the canoe with a length of rope wrapped around each end. Tie a permanent loop in both ends of the ropes. Use a carabiner to clip the ends of each rope together to create a support loop for each end of the canoe. Then rig a length of ¼” (7 mm) braided rope (I use multi-filament polypropylene – MFP – rope) through a series of pulleys as illustrated above and install a cleat to secure the free-end of the rope.

photo by Kevin Dunn
4. Interior Design – Let’s face it, wood-canvas canoes are works of art and as such can enhance a living space. They can set a tone for the room and become a conversation piece for visitors. A little creativity can provide a method for hanging the canoe that shows off your canoe to its best advantage. This is an option as long as the space has large doors to allow the canoe to be moved into and out of the space. Narrow hallways or tight corners into the space would eliminate this as an option.

photo by Kevin Dunn
Warning: When storing your canoe (either inside or outside), resist the temptation to wrap it up in a tarp. Any moisture trapped inside the tarp or developed over extended wet periods will remain there. As mentioned earlier, this sets up perfect growing conditions for the fungi that cause wood-rot. If you want your canoe to compost, then wrap it up in a tarp. Otherwise, make sure there is plenty of air circulation around your canoe and never wrap it in a tarp.

All of this (and much more) is described in my book – This Old Canoe: How To Restore Your Wood Canvas Canoe.
If you live in Canada, CLICK HERE to buy the book.
If you live in the USA, CLICK HERE to buy the book.
If you live in the UK, CLICK HERE to buy the book.
Si vous habitez en France, CLIQUEZ ICI acheter le livre.
If you have read the book, please post a review on Amazon and/or Goodreads and/or any other review site.
Weaving the Peterborough Pattern in Wood-Canvas Canoe Seats
August 5, 2018
by Mike Elliott, Kettle River Canoes
email: artisan@canoeshop.ca

In my book, This Old Canoe: How To Restore Your Wood-Canvas Canoe, I describe how to weave natural cane (rattan) in Chestnut canoe seats. However, most canoe builders used their own weaving pattern for their canoe seats.

The Peterborough Canoe Company (1879 – 1961) installed hand-woven cane seats in many of their wood-canvas canoes as well as many of their all-wood canoes. Their pattern is similar to the six-stage “quick” pattern used by the Chestnut Canoe Company (1897 – 1978). Only the sixth stage in the pattern is different. In the Chestnut pattern, both diagonal weaving stages (fifth and sixth stages) weave under the vertical strands and over the horizontal strands. In the Peterborough pattern, the sixth stage weaves over the vertical strands and under the horizontal strands.
In my book, I describe the full process of preparing the seat frames, preparing the cane and handling the cane during the weaving process. Here I will present the basic look of each stage and give details for the sixth stage only for the Peterborough pattern.

First Stage ̶ Vertical strands

Second Stage ̶ Vertical strands arranged beside the strands of the first stage

Third Stage ̶ Horizontal strands

Fourth Stage ̶ Horizontal strands arranged beside the strands of the third stage


Fifth stage – Diagonal strand woven under the vertical strands and over the horizontal strands

Sixth stage – Begin the pattern in the empty corner on the transverse rail of the seat. Feed one end of the cane strand through the corner hole from the top-side to the under-side. Secure the strand-end in the usual manner. Secure the strand in the corner hole with a caning peg on the top-side.

Trim the working-end of the cane strand to create a sharp point. This makes weaving easier. Make sure the shiny side of the strand faces up and is not twisted. Start the weaving pattern by going under the diagonal strand next to the corner hole on the transverse rail of the seat. Then, weave over the first set of vertical strands in the pattern and under the first horizontal strands. Continue in this way (over the second set of vertical strands and under the second horizontal strands) until you reach the opposite transverse rail.

Make sure you weave under the diagonal strand on the transverse rail before threading the strand down through the hole. Pull the strand snug (but not tight) and secure the strand with a caning peg.

Continue with this pattern for each diagonal strand as you work toward the empty corner in the bottom transverse rail of the seat frame. As usual, the corner hole has two strands since it is both a hole along the transverse rail and the side rail. The strand going into the corner hole as part of the transverse rail strands weaves under the final diagonal strand before entering the hole. The second strand from the corner hole begins by weaving over the diagonal strand, then under the first set of horizontal strands and over the first set of vertical strands. Continue in the way until you reach the top transverse rail of the seat frame.
I rarely weave the Peterborough pattern. Consequently, I have to check and re-check my work constantly. I work slowly and carefully to ensure that my mistakes are made as quickly as possible.

Complete the sixth weaving stage at the corners of the seat. Make sure the strand weaves under the diagonal strand from the transverse rail and over the diagonal strand from the side rail.

Complete the seat weaving with the usual “couching” to cover the holes in the seat frame. The couching is held in place with loops of cane in every second hole around the seat frame.
Complete instructions on seat caning (and much more) are available in my book – This Old Canoe: How To Restore Your Wood Canvas Canoe.
If you live in Canada, CLICK HERE to buy the book.
If you live in the USA, CLICK HERE to buy the book.
If you live in the UK, CLICK HERE to buy the book.
Si vous habitez en France, CLIQUEZ ICI acheter le livre.
If you have read the book, please post a review on Amazon and/or Goodreads and/or any other review site.

