How To Weave Rawhide (Babiche) Seats for “Huron” Wood-Canvas Canoes
April 15, 2018
by Mike Elliott, Kettle River Canoes
email: artisan@canoeshop.ca

If the seats in your canoe are laced with rawhide similar to that in old snowshoes, chances are you own a “Huron” canoe – the generic name for canoes built in Huron Village (renamed Wendake in 1986). The “babiche” is likely to last longer than the canoe, but at some point you may need to re-lace the seat frames.

Seat frames for “Huron” canoes are constructed of birch or maple and assembled with mortise and tenon joints that are very rough and loose. No glue is used in the joinery, so the rawhide lacing is the only thing holding the frames together. As with all of the other components in a canoe, I prefer to apply finish to the frames before I lace them. The bow seat requires about 65’ (20 meters) of 3/16” (5 mm) rawhide lace while the stern seat requires about 50’ (15 meters). The lacing is usually shipped in a long tube and is as hard as a rock. It has to be soaked for several (5 or 6) hours before it can be used to lace the seats. I use the bath tub at home and add a little borax to the water to help loosen the rawhide and make it easier to manipulate. It will take a few hours to lace a seat, so keep a large bowl of water nearby in order to re-soak the lacing as you work. Handling rawhide lace for several hours can be hard on the hands and the borax can really dry out your skin. Use a hand lotion both before and after lacing a seat to help avoid damage to your skin.

The lacing pattern I describe is the most common one found in canoe seats. It is by no means the only one. The process can be applied to all the other patterns. However, some are more complicated than others. The stern seat has 36 anchor-points – 9 on each of the 4 frame rails. The bow seat is wider than the stern seat. Therefore, it usually has 11 anchor-points on each of the frame rails. In order to make this fit, the anchor-points on the side rails are placed very close together. This will provide enough room for one more complete repetition of the pattern.

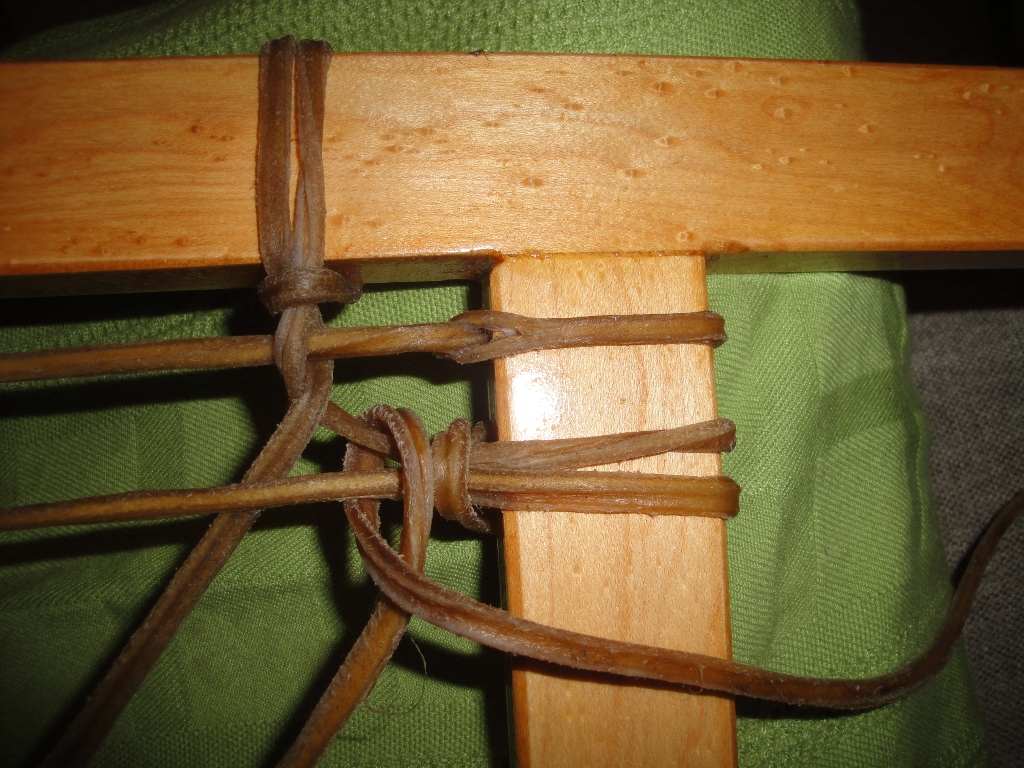
The only tool I use is a sharp pocket knife. It trims the lacing and cuts small slits in the ends of pieces for joining. The entire pattern is laced using just a few basic knots and joins. The starting anchor join at 1.1 is made by threading the lace through a small slit in the end of the first lace in the pattern. Throughout the lacing pattern, pull the rawhide firmly but not tight. As the rawhide dries, it becomes very tight.

All of the remaining anchor points are tied using a larks-head knot. To perform this knot, you start by passing the lace over the frame. Wrap around to come up on the “outer” side of the lace and pass over the strand that was just made. Bring the lace back under the frame, then around to finally pass back over the frame and under the lace “bridge” to form the knot. In this case, a picture is worth a thousand words, so use the photo as your guide.

Anchor-points 1.2, 1.3 and 1.4 form a triangle pattern on the frame. As you go from 1.3 to create the anchor-point at 1.4, pass the strand under the horizontal. The strand then passes over the horizontal and under the diagonal “forward slash” ( / ) strand before tying off at anchor point 1.5. All subsequent weaving in the fourth strand follows this pattern.

The fifth strand of the pattern passes over the forward slash strand and under the “backslash” (\ ) strand before tying off at anchor point 1.6. All of the subsequent weaving in the fifth strand follows this pattern.

The sixth strand weaves over the “backslash” strand and under the horizontal strand before tying off at anchor point 1.7. All of the subsequent weaving in the sixth strand follows this pattern.

The seventh strand passes over the horizontal strands and under the “forward slash” strand before tying off at anchor point 1.8. All subsequent weaving in the seventh strand follows this pattern.
The eighth strand does not have any weaving, but it finishes by passing over both the fourth and the fifth strands at the fifth anchor-point in that repetition of the pattern. It wraps under the strands and then up and over itself before forming the first anchor-point in the next repetition of the pattern.

From now on the pattern is repeated with one addition. After forming the second anchor-point in the pattern and before weaving the second strand, stabilize it by passing over both the fifth and seventh strands of the previous set, then come up and over itself. The second strand requires no weaving.

The seat is woven with progressively more and more weaving required as each set of the pattern is performed.

At some point, usually two or three times in a given seat, you come to the end of a piece of rawhide lace. To continue weaving, join the next lace to the previous one. The joins are made by cutting a small slit in each end. The end of the old strand is passed through the slit in the new strand. The entire new strand is then fed through the slit in the end of the old strand to create a secure join. I like to locate the joins so they lie on the underside of the frame.

Once you have completed the lacing pattern, the last larks-head knot is tied at the final anchor-point and the rawhide is knotted with one or two half-hitches.

Allow the rawhide to dry for a couple of days. Then apply a mixture of two parts boiled linseed oil and one part turpentine. Let the oil mixture dry for at least a week. The seat will be finished with spar varnish (thinned 12% with painter thinner/mineral spirits).

All of this (and much more) is described in my book – This Old Canoe: How To Restore Your Wood Canvas Canoe.
If you live in Canada, CLICK HERE to buy the book.
If you live in the USA, CLICK HERE to buy the book.
If you live in the UK, CLICK HERE to buy the book.
Si vous habitez en France, CLIQUEZ ICI acheter le livre.


April 15, 2018 at 10:58 pm
Two questions, Mike!
1. I thought the seat was woven with one looong piece of rawhide but you say that we will inevitably need to join two pieces together. How long a lace do you generally start with?
2. I’ve bought the babiche to reweave both seats on my 15′ Tremblay but, unlike the Huron, holes are drilled in the frames (12×10 in the stern & 14×10 in the stern) and the weaving pattern looks similar but not exactly the same. (I took a couple of pictures before cutting out the old seats but I doubt that they will be enough to replicate…!) Do you know of a reference for guidance?
Thanks, Brian
April 16, 2018 at 4:28 pm
Hi Brian,
1. The lace is cut from a piece of hide. It is generally cut in a big spiral to get as much lacing as possible from one hide. The piece can be anywhere from 10′ to over 50′ long. Joining them together is quick and easy (as described in my blog article). I soak the entire package of lacing and select the longest piece to start.
2. I would have to do a Tremblay seat in order to guide you through the process. I have a couple of old frames in the shop (my reference library), so I’ll get back to you with instructions. Send me an email — artisan@canoeshop.ca — and we can communicate more easily.
Cheers, Mike
June 2, 2018 at 5:48 pm
Thanks Mike! Very clear and good instructions. I used the same pattern on a pack frame here, just using thinner lace from a dog chew Red deer (Cervus elaphus).
I’m now looking into treatment alternatives. All lacquers and varnishes here contains too much chemicals for my taste so I’m trying a linseed oil and beeswax mix 1:1. Ideally I’d like to try a resin based varnish but that seems to be too much work.